SENDING INSTANT MESSAGES
WITH DENTALINK
Dentrix Dentalink provides your office with secure instant messaging. With Dentalink,
you have the ability to create and send messages between workstations. Each
workstation can be set up to send and receive messages. And these messages
never leave the practice’s private computer network, so you can confidently send
messages knowing that private patient health information will remain private.
Browse to www.dentrix.com/getting-started/dentalink to watch video demonstrations of
the tasks in this guide and nd more information about sending instant messages with
Dentalink.
GETTING STARTED GUIDE
IN TOUCH
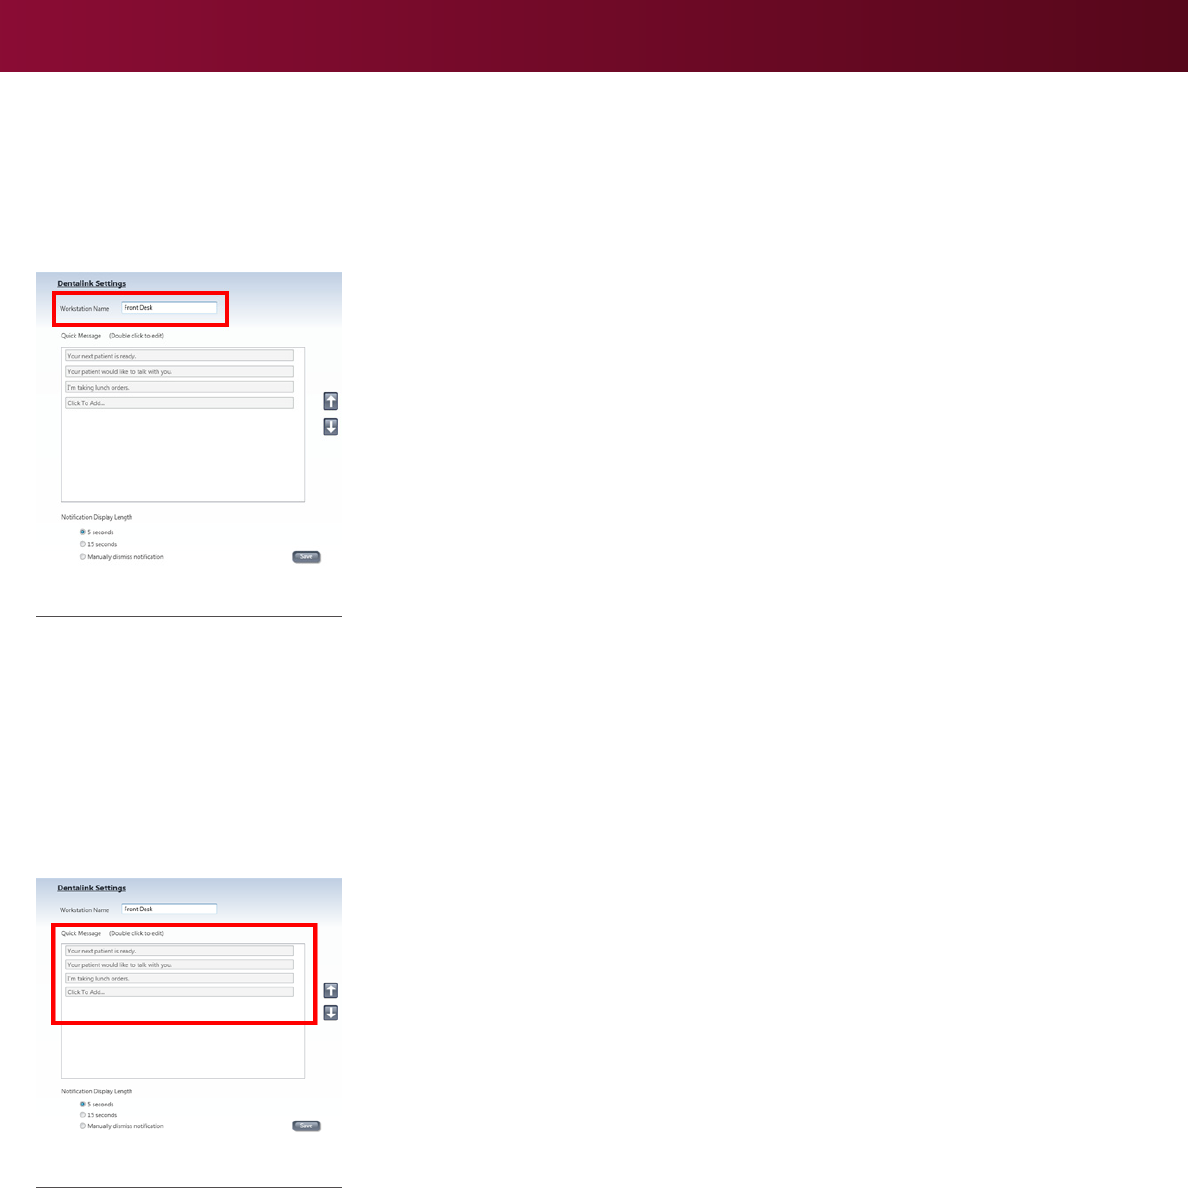
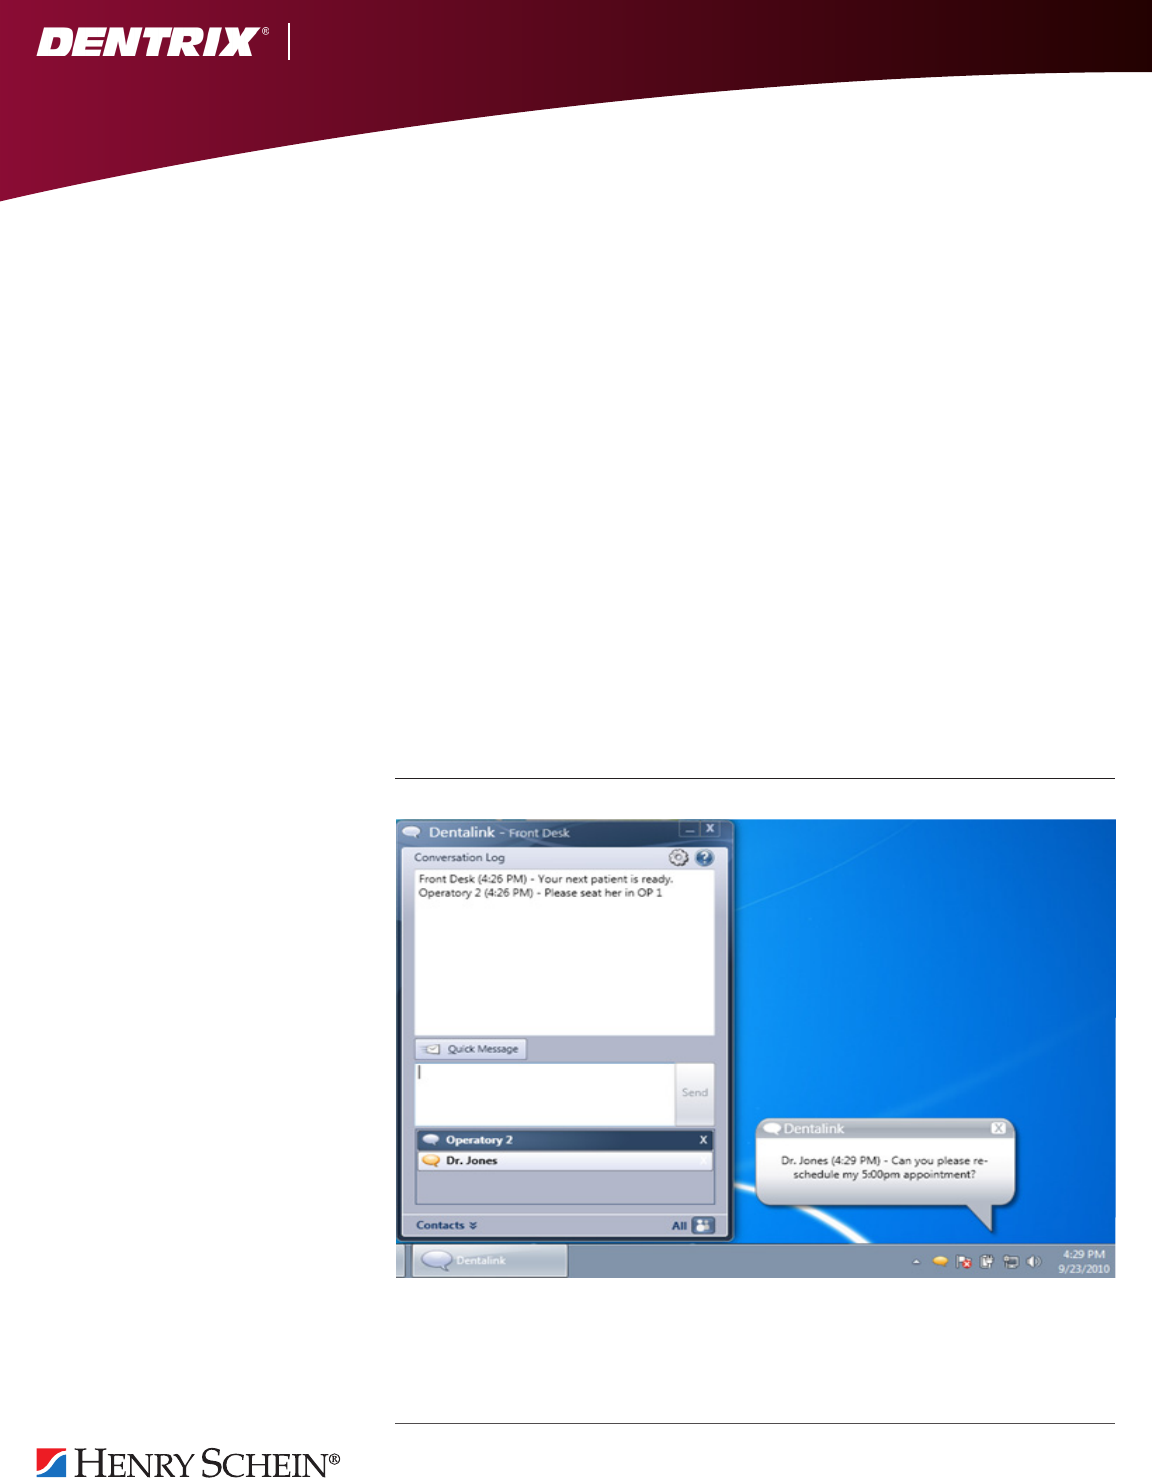
Figure 1.
Prerequisites
Before you can begin using Dentalink, you must have Dentrix G4 Productivity Pack 8
installed. You must also have eSync 3.1.5 installed on each networked computer on
which you want to use Dentalink. Dentalink is provided as a plug-in with eSync, and is
automatically installed when you install eSync 3.1.5.
To download eSync and the eSync Installation Guide, visit www.dentrix.com/products/
eservices/esync.
Once you have installed Productivity Pack 8 and eSync 3.5.1, a Dentalink icon is added
to your Windows desktop and to the Windows notication area.
Entering the Workstation Name
Each computer in your practice has an assigned computer name. Dentalink uses this
name to identify the workstation in the Contacts list. However, you can change the
name Dentalink uses to a name that is more representative of the workstation’s location
or primary user. Once assigned, the workstation name appears as the contact name on
other computers running Dentalink.
Follow the steps below to edit a workstation name. Browse to www.dentrix.com/getting-
started/dentalink to view a video of the steps.
1. In the Windows notication area, click the eSync icon.
2. In eSync, click the Settings button.
3. In the eSync Settings window, click the Dentalink button.
4. From the Dentalink Settings pane, click the Workstation Name eld (Figure 1),
and enter a workstation name, such as Front Desk or Operatory 1.
5. Click Save.
6. Repeat these steps on each workstation. You must set up each workstation
name separately.
Adding Quick Messages
Some oce routines require the same or similar messages to be sent multiple times
throughout the day. Rather than entering the same message text repeatedly, you can use
Quick Messages to create message templates. Quick Messages are created and managed
separately for each computer, and each Quick Message is limited to 100 characters.
Follow the steps below to add a Quick Message. Browse to www.dentrix.com/getting-
started/dentalink to view a video of the steps.
1. In the Windows notication area, click the eSync icon.
2. In eSync, click the Settings button.
3. In the eSync Settings window, click the Dentalink button.
Figure 2.
2 | Sending Instant Messages with Dentalink
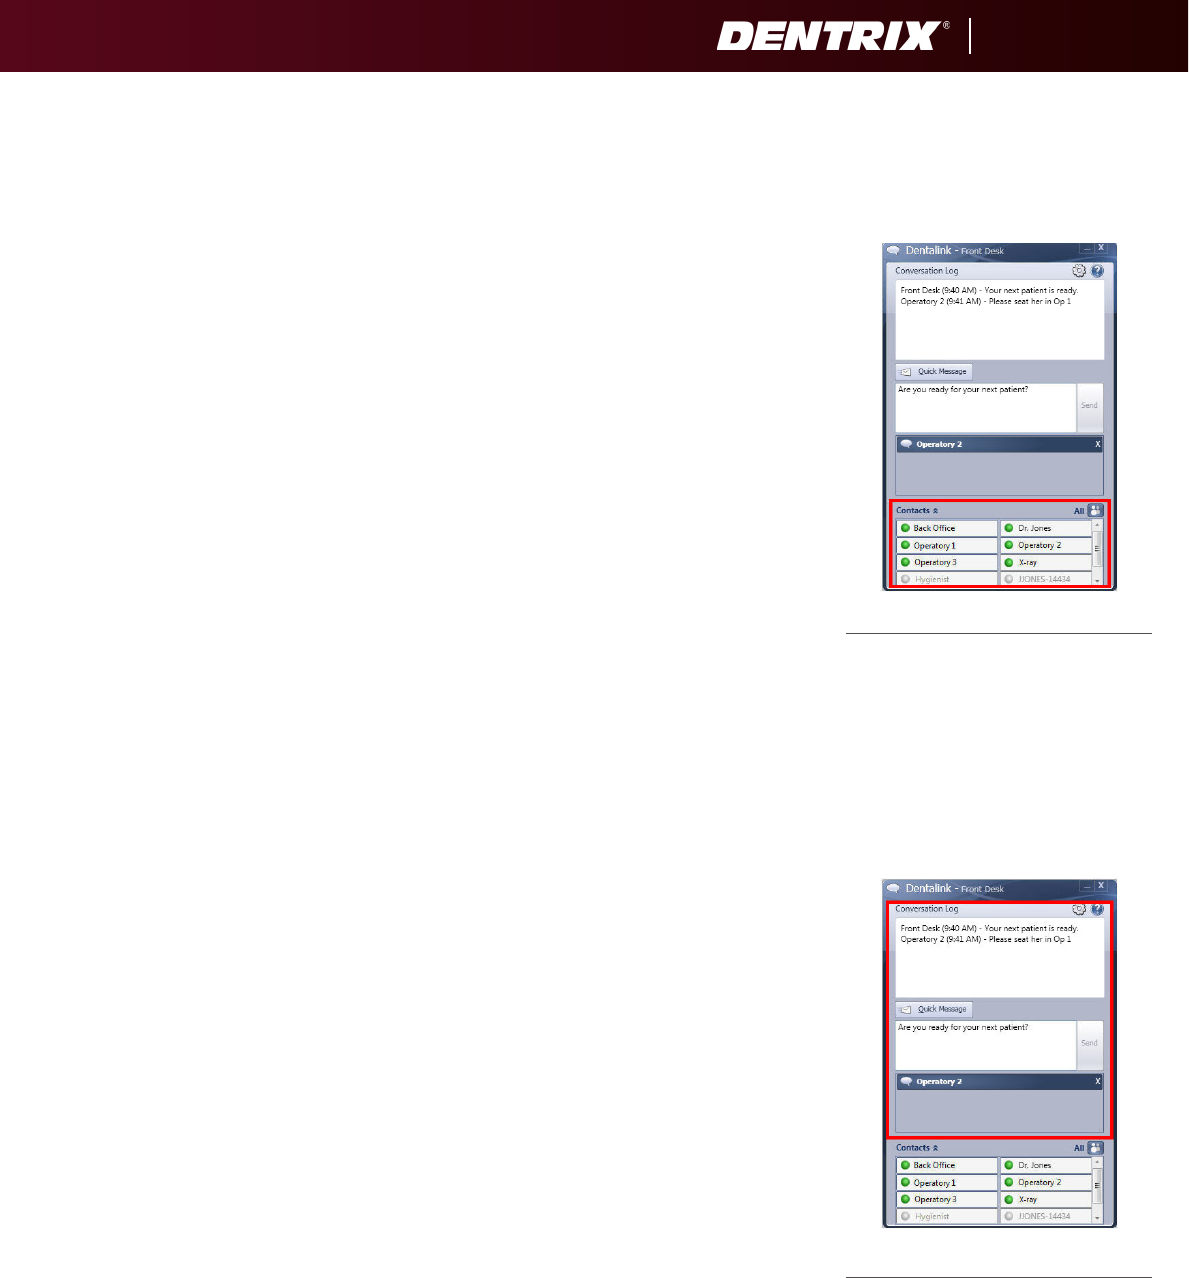
Figure 3.
4. From the Dentalink Settings pane, click Click to Add... in the Quick Messages
box (Figure 2).
5. Type the desired message text. Note: Quick Messages are limited to 100 characters.
6. When nished, click Save.
7. Repeat these steps to add more Quick Messages to the current workstation.
en, repeat the steps on each workstation that needs to send Quick Messages.
Sending Messages
Communication between Dentalink contacts is called a conversation. Workstations you
have set up appear in the Contacts list.
Follow the steps below to send a message. Browse to www.dentrix.com/getting-started/
dentalink to view a video of the steps.
1. Right-click the Dentalink icon in the Windows notication area.
2. Click the Contacts bar to display the list of workstations you have set up. Note:
Contacts appear in the list alphabetically with a colored icon to indicate online
or oine status. Colored icons indicate either online (green) or oine (gray)
status (Figure 3). You can only send messages to contacts with an online status.
3. Click the online contact(s) to whom you want to send a message, or click the
All icon to send your message to all online workstations. A conversation is
established with selected contact(s) in the Conversations Area (for example
“Operatory 2” in Figure 4). e Chat Box is enabled with the cursor ready for
you to begin typing.
4. Type your message in the Chat Box, or click the Quick Message button and
select a pre-dened Quick Message from the list.
5. Click Send or press ENTER. e message is sent to the recipient(s) and the
message is posted to the Conversation Log (Figure 4). Each message is identied
by its sender and time.
Receiving Messages
When you receive a new message, or a reply from an established conversation, the following
occurs:
• A tone sounds
• A message bubble appears briey in the Windows notication area
• e Dentalink icon in the notication area changes to its “unread” state, and
begins to ash if unopened
• If the message is a new conversation, a Conversation Bar appears, and the
Conversation Bar icon changes to its “unread” state
Once a message has been received, you have the option of replying to the message and/
or ending the conversation.
Figure 4.
Sending Instant Messages with Dentalink | 3
IN TOUCH

www.Dentrix.com | 1-800-DENTRIX
©2011 Henry Schein Inc. All rights reserved. Henry Schein Practice Solutions makes no representations or warranties with respect to
the contents or use of this documentation, and specically disclaims any express or implied warranties of title, merchantability, or tness
for any particular use. All contents are subject to change. Not responsible for typographical errors. Henry Schein, Dentrix and the ‘S’
logo are registered trademarks of Henry Schein, Inc. Other products are trademarks or registered trademarks of their respective owners.
Replying to Messages
Follow the steps below to reply to a message or end a conversation. Browse to www.dentrix.com/
getting-started/dentalink to view a video of the steps.
To view and reply to a message:
1. Click the Conversation bar of the conversation you want to view. e conversation
appears in the Conversation Log and the cursor appears in the Chat Box (Figure 4).
2. In the Chat Box, type your reply or new message, then click Send or press ENTER.
To end a conversation:
1. In the Dentalink window, select the desired conversation. An X appears at the
far right of the Conversation Bar.
2. Click the X. All messages are cleared from the Conversation Log and Chat Box,
and the conversation is removed from the Conversations Area.
Note: Although you can start another conversation with that contact at any
time, any previous message history will not be preserved.
More Information
Browse to www.dentrix.com/getting-started/dentalink to watch video demonstrations of
the tasks in this guide. To nd more information about sending instant messages using
Dentalink, browse to www.dentrix.com/dentalink.
Click the Help icon in the top right corner of the Dentalink window, or click Help from
eSync or any eSync plug-in (as long as Dentalink is also installed) to search Help les for
more information about using Dentalink.
For technical assistance, contact Dentrix Customer Support at 1-800-DENTRIX.
IN TOUCH
