HeartStart Data Messenger
User guide

About this edition
HeartStart Data Messenger 4.3
Publication date: September 2014
Document part number: 453564532871
The information in this document applies to the product
version indicated above. This information is subject to
change without notice.
Philips Healthcare shall not be liable for errors contained
herein or for incidental or consequential damages in
connection with the furnishing, performance, or use of
the material.
Copyright
Copyright © 2014
Philips North America Corp.
No part of this publication may be reproduced,
transmitted, transcribed, stored in a retrieval system, or
translated into any human or computer language in any
form by any means without the consent of the copyright
holder.
Unauthorized copying of this publication may not only
infringe copyright but also reduce the ability of Philips
Healthcare to provide accurate and up-to-date
information to users and operators alike.
Medical device directive
Philips HeartStart Data Messenger complies with the
requirements of the Medical Device Directive 93/42/EEC
and carries the mark accordingly.
Trademarks
Philips HeartStart Data Messenger, HeartStart FR3,
HeartStart FRx, HeartStart HS1, HeartStart Defibrillator,
and the HeartStart logo are either trademarks or registered
trademarks of Koninklijke Philips Electronics N.V.
The Philips HeartStart Data Messenger application uses
Bluetooth wireless technology. The Bluetooth wordmark
and logos are either trademarks or registered trademarks
of Bluetooth SIG, Inc. The Bluetooth wordmark and logos
are owned by Bluetooth SIG, Inc.
Linksys® is a registered trademark and a division of
Cisco Systems, Inc. in the United States and other
countries.
Acrobat, Adobe Reader, and PDF are either trademarks or
registered trademarks of Adobe Systems Incorporated in
the United States and/or other countries.
Microsoft®Windows, Windows XP, Windows Vista,
Windows 7, Windows Explorer, Microsoft .NET
Framework, and Internet Explorer are either trademarks
or registered trademarks of Microsoft® Corporation in
the United States and/or other countries.
Authorized EU Representative
Philips Medizin Systeme
Boeblingen GmbH
Hewlett-Packard Strasse 2
71034 Boeblingen, Germany
(+49) 7031 463-2254
Device Manufacturer
Philips Medical Systems
22100 Bothell Everett Highway
Bothell, WA 98021-8431, USA
EN 9/22/2014

Table of contents
Installing HeartStart Data Messenger 7
About the Data Messenger software 7
System requirements 8
Downloading Data Messenger 10
Limited-feature version 10
Downloading an update 11
Installing Data Messenger 12
Uninstalling Data Messenger 12
Activating Data Messenger 13
Activate over the Internet 13
Activate by email 14
Activate later 15
Getting started 16
Intended use 16
New in this release 16
Document conventions 17
How Data Messenger is used 17
Starting Data Messenger 18
HeartStart Data Messenger features 19
Understanding Data Messenger transmissions 19
Planning your workflow 20
Data Messenger tasks 21
Overview 21
Monitoring the transfer of event-summary data 22
Configuring Data Messenger workflow 23
Monitoring system activities 23
Typical uses of Data Messenger 23
Uses with HeartStart HS1 and HeartStart FRx 24
Uses with HeartStart FR3 25
Uses with HeartStart FR2 and HeartStart XL 25
Uses with HeartStart MRx 26
3

4
Table of contents Data Messenger user guide
Configuring HeartStart Data Messenger 28
Using the Data Messenger Configuration window 29
Opening the Data Messenger Configuration window 32
Closing the Data Messenger Configuration window 32
Setting up Data Messenger preferences 33
Configuring Data Messenger to process cases in the Automatic mode 33
Adding default case identifiers 34
Storing System Log messages and backup files 35
Controlling feedback messages 36
Modifying the workflow for case processing 37
Using reports 39
Setting up the email case data feature 40
Specifying inboxes for HeartStart MRx data 40
Setting up a Bluetooth inbox for the HeartStart MRx 41
Setting up batch LAN data transfer for the HeartStart MRx 41
Cleaning up incomplete transmissions 42
Specifying advanced workflow for the HeartStart MRx 43
Managing configurations in Data Messenger 44
Saving configurations 45
Importing configurations 45
Exporting configurations 46
Processing cases manually 47
Using the Data Messenger Manual Process window 47
Opening the Data Messenger Manual Process window 48
Closing the Data Messenger Manual Process window 49
Receiving cases 49
Viewing cases 50
Selecting cases 50
Editing cases 51
Viewing and printing a case report 52
Opening saved cases 53
Processing cases 54
Deleting cases from Data Messenger 54
Deleting cases from defibrillators or their data sources 55
Processing cases automatically 56
Using the Automatic mode 56
Using the Data Messenger icon in the notification area 57
Using the Notifications window 59
Working with the System Log 60

5
Table of contents Data Messenger user guide
Activities logged by Data Messenger 60
Displaying the System Log 61
Working with columns 61
Sorting entries in a column 62
Grouping entries 62
Clearing System Log entries 63
Troubleshooting system activities 63
Working with defibrillators 65
Supported defibrillators 65
Transferring HeartStart FR3 data 66
Preparing the FR3 to transfer data 67
Transferring FR3 data to Data Messenger using Bluetooth wireless
technology 68
Transferring FR3 data to Data Messenger using data cards 70
Reading HeartStart FR2 data 71
Downloading HeartStart FRx and HeartStart HS1 data 72
Setting up an infrared adapter 72
Downloading HeartStart FRx data 73
Downloading HeartStart HS1 data 74
Determining the case date and time 75
Deleting cases from HeartStart FRx or HeartStart HS1 defibrillators 76
Working with HeartStart MRx data 76
Downloading HeartStart MRx data using Bluetooth 78
Understanding Bluetooth for HeartStart MRx 78
Prerequisites for using Bluetooth for HeartStart MRx 79
Setting up Bluetooth for HeartStart MRx 79
Pairing and testing the HeartStart MRx Bluetooth option 80
Sending HeartStart MRx Bluetooth transmissions 81
Downloading HeartStart MRx data using batch LAN data transfer 82
Understanding the batch LAN data-transfer process 82
Prerequisites for using batch LAN data transfer 83
Reading XL data 83
Transferring XL+ data 84
Selecting accessories for data transfer 85
Selecting data-transfer adapters and readers 85
Selecting Bluetooth accessories 88
System Log messages 89
Using the HeartStart Data Messenger Mobile Edition 98
Mobile Edition prerequisites 98

6
Table of contents Data Messenger user guide
System requirements for the Mobile Edition 99
Guidelines for using the Mobile Edition 100
Installing the Data Messenger Mobile Edition 101
Installing the Mobile Edition using a Windows 7 computer 101
Installing the Mobile Edition using a Windows XP computer 102
Understanding synchronization 103
Synchronizing Data Messenger with the Mobile Edition 104
Starting the Mobile Edition 105
Using the Mobile Edition 105
Waking the mobile device before transmissions 106
Monitoring activity on the mobile device 106
Uninstalling the Mobile Edition 106
Removing the Mobile Edition using Windows 7 107
Removing the Mobile Edition using Windows XP 108
Implementation references 109
Customer support 110
Glossary 114
Index 119

1
Installing
HeartStart Data
Messenger
This section contains system requirements, plus installation, updating,
and activation procedures for Data Messenger. Also included is
information about uninstalling Data Messenger.
About the Data Messenger software
You can use the Data Messenger software on a personal computer,
laptop, or tablet PC. For supported computer platforms, see System
requirements on page.8.
When you download Data Messenger software, you are downloading the
complete software, with access to all capabilities.
You can use the Data Messenger Configuration window to configure
additional data-identification information, to set up Data Messenger in
either the Manual Process or the Automatic mode, and to configure your
workflow and the destinations that receive the patient data.
In the Manual Process mode, you can use the Data Messenger Manual
Process window to receive case data from your defibrillator, and to
monitor patient data and Data Messenger system activity. You can edit
patient-identification information, print a case report, and prepare and
forward (process) the data files manually. You can also prepare the
defibrillator for the next use by removing the data on it.
In the Automatic mode, you see status messages as Data Messenger
processes patient data without your intervention. Data Messenger
receives defibrillator data, such as patient event summaries, 12-lead
reports, or periodic clinical data. The software then processes the data
according to the preconfigured workflow.
7
8
You can use all of the Data Messenger capabilities on a trial basis for 60
days before purchasing an activation license. Philips recommends that
you purchase a license and activate the software before the 60 days has
expired. See Activating Data Messenger on page.13.
System requirements
This topic describes the minimum requirements to run Data Messenger.
You should choose hardware that is certified as Microsoft-compatible.
The software and hardware listed in the following table are provided by
the customer, unless noted. The table includes a few components that
are not required but that may be useful.
This table has the following sections:
• Software requirements
• Hardware requirements
• Accessories
Component Requirements and purpose
Software requirements
Operating
system
Microsoft Windows XPProfessional SP 3 (32-bit)
Microsoft Windows XP Tablet Edition (32-bit)
Microsoft Windows 7 (32-bit and 64-bit)
Data Messenger is tested and validated only with the above
operating systems. Other operating system versions are
unsupported.
Browser Microsoft Internet Explorer 7.0 or later
To access the Internet for product downloads.
Hardware requirements
Processor
speed
1 GHZ or higher
Display 1280 x 768 or higher
Memory Minimum:1 GB
Disk storage
space
Minimum: 40 GB
1 - Installing HeartStart Data Messenger Data Messenger user guide

9
Internet or
intranet
connection
To download and activate the software.
To transfer a case to HeartStart Event Review Pro and HeartStart
Telemedicine destinations.
Ethernet
connection
To receive HeartStart MRx data through batch LANdata
transfers.
Accessories
PDFReader To view the HeartStart Data Messenger user guide.
To view Data Messenger reports.
Backup and
restore tool
To prevent data loss.
Recommended: Store backup information at a separate location
on the backup device of your organization's choice. You should
have a plan for recovering information in the event of a software
or hardware failure.
Email
application
To send cases using email.
To activate the software using an alternate method.
To configure a MAPIclient when using an email client.
Printer To print Full Disclosure and Pre- and Post-shock reports.
Recommended:Postscript printer
Bluetooth
adapter
To transfer HeartStart FR3 or HeartStart MRx patient data using
Bluetooth wireless transfer.
For more HeartStart MRx information, see the Data transmission
implementation guide.
FTPserver To support HeartStart MRx batch LANdata transfers.
You will need a login and password. Consult ITpersonnel for
further information.
Infrared
Data
Associates
(IrDA)
adapter
To retrieve and send information from HeartStart FRx and
HeartStart HS1 defibrillators.
You can purchase an infrared adapter from Philips.
Your computer must support IRDA functionality and an infrared
adapter.
1 - Installing HeartStart Data Messenger Data Messenger user guide

10
Card reader
or card
adapter
To receive defibrillator data.
HeartStart FR3 defibrillators use a custom Philips version of the
CompactFlash card.
HeartStart FR2 and HeartStart MRx defibrillators use a Compact
Flash card.
HeartStart XL defibrillators use ATAflash cards with ATAflash-
card readers.
HeartStart XL+ defibrillators use a USB drive and USB port.
Mobile
devices
To monitor Data Messenger as the software receives, prepares,
and transfers patient data according to the preconfigured
workflow.
Windows Mobile 6.5
Wifi or Internet access to transfer patient data using infrared
transmission, data-card access, or Bluetooth transmission.
For information about Bluetooth accessories, see Selecting
accessories for data transfer on page.85.
To synchronize information, use:
Microsoft ActiveSync for Windows XP or Windows tablet PC
Windows Mobile Device Center for Windows 7
Downloading Data Messenger
To download the current version of Data Messenger from the Internet,
use the instructions that you received from Philips or your sales
representative.
To download Data Messenger
1. Use your Internet browser to navigate to the following URL, which is
also provided on your Proof of Purchase certificate:
http://www.philips.com/DataMessengerDownload
2. Save the software on your preferred media.
Limited-feature version
If your Data Messenger software has been installed for 60 days, and you
have not yet purchased an activation license, your software will revert
to a limited-feature version.
1 - Installing HeartStart Data Messenger Data Messenger user guide

11
When using the limited-feature version, you will no longer be able to
perform some processes on your data. The Automatic mode is not
supported, and you will be unable to transfer cases to another
destination.
You will be able to download the data from a defibrillator, and view and
print the case report. You can also prepare the defibrillator for the next
patient by removing the current patient data from Data Messenger and
its data source—either a defibrillator, a data card, a Bluetooth inbox, or
a FTP folder.
Contact customer support if your software has reverted to the limited-
feature version, and you want to activate it. See Customer support on
page.110.
A Mobile Edition of Data Messenger is available (only in English), for
use in special circumstances. It is supported on a limited number of
mobile devices. The Mobile Edition software is included in the initial
download of Data Messenger software. However, the Data
Messenger license must be activated before the Mobile Edition can
be set up. For details, see Mobile Edition prerequisites on page.98.
Downloading an update
At any time, you can use the Check for Updates option on the Help menu
to look for and download an updated version of the software.
Before you install the software update, make sure that you have
Windows Administrator privileges on the computer.
To download the update
1. Open the Data Messenger software that you want to update.
2. On the Help menu, click Check for Updates.
The software connects to the Internet. A wizard window searches for
updates and displays a list of updates.
3. Click Data Messenger.
4. Click Download.
Note the name and location of the download that you want to save.
5. When the file finishes downloading, click Finish.
6. Close the Data Messenger window.
1 - Installing HeartStart Data Messenger Data Messenger user guide

12
7. Navigate to the directory where you saved the downloaded
installation file with the .exe extension.
8. Double-click the installation file.
9. Follow the on-screen instructions.
Installing Data Messenger
You can install the software from the file that is saved on your
computer, or from a file that is saved on your preferred media.
To install Data Messenger, you must have Windows Administrator
privileges on the Data Messenger computer.
To install Data Messenger
1. Navigate to the directory where you saved the downloaded
installation file.
2. Double-click the setup file.
A message might appear advising that the Data Messenger
installation will make changes to the computer.
3. Click Yes to continue with the installation.
4. Follow the on-screen instructions.
Uninstalling Data Messenger
You can remove Data Messenger from the computer to reuse the license
on another computer at any time. For example, you might want to do
this if you no longer need to use Data Messenger, or if you want to
install the software on another computer.
Configuration files are not deleted when the application is uninstalled, so
you can reinstall Data Messenger or upgrade later.
In order to deactivate the software license and reuse it on another
computer, you must connect your computer to the Internet. If you
do not deactivate the license, you cannot use the second
nonactivated software after the 60-day trial period. Contact
customer support if you do not have access to the Internet.
1 - Installing HeartStart Data Messenger Data Messenger user guide

13
If you use Mobile Edition, you can also remove the Data Messenger
Mobile Edition from the mobile device without removing the software on
the current computer. See Uninstalling the Mobile Edition on page.106.
Activating Data Messenger
After you install the software, activate Data Messenger. Activation is
designed to verify that software products are licensed correctly.
Activation is required to continue using the complete version of Data
Messenger without interruption. See your proof of purchase booklet for
activation information, or consult your Philips Account Manager for
information on purchasing the activation license. If the license is not
activated within 60 days, Data Messenger reverts to a limited-feature
version. See Limited-feature version on page.10.
When you activate the software, you need the product serial number on
the Proof of Purchase certificate that you received. Save the product
serial number in a safe place in case you need to re-install the software.
You can use the Internet (Activate over the Internet on page.13) or
email (Activate by email on page.14) to activate the software after you
install Data Messenger. Until you complete the activation, you will see
the Philips HeartStart Activation Wizard window when the software
starts.
The person who activates the software in Windows 7 should use the
Administrator account.
Activate over the Internet
Internet activation is faster than activating by email, and is the
preferred activation method.
The activation wizard sends encrypted information to Philips to validate
the product serial number.
To activate the software by the Internet
1. Start the software.
The software displays HeartStart Activation Wizard.
2. In the Serial number field, type the product serial number. A product
serial number looks like this: Z0410X999999879
1 - Installing HeartStart Data Messenger Data Messenger user guide

14
3. Click I Want to Activate the Software over the Internet.
4. Click Activate.
The wizard validates your entry. When the activation is successful,
the wizard displays a congratulations message.
5. Click OK.
The wizard starts Data Messenger.
Activate by email
Email activation is slower than activation by Internet, and is not the
preferred activation method. It might take several business days to
complete the activation.
Email activation involves exchanging emails with Philips Customer
Support.
You can click the Help button in the Activation Wizard to print the steps
on how to activate the software by email.
To activate the software by email
1. Start the software.
The software displays HeartStart Activation Wizard.
2. In the Serial number field, type the product serial number. A product
serial number looks like this: Z0410X999999879
3. Click I Want to Activate the Software by Email.
4. Click Next.
5. Click Request Activation Code.
The wizard sends your email request to Customer Support and starts
the software.
When you receive an email from Customer Support, complete
the following
1. Start the software.
The software displays the HeartStart Activation Wizard with the
product serial number that you entered.
2. Click I Want to Activate the Software by Email.
3. Click Next to access the Activate by Email page.
4. In the Enter your activation code field, type the activation code.
1 - Installing HeartStart Data Messenger Data Messenger user guide

15
5. Click Activate.
The wizard validates your entry and displays a congratulations
message.
6. Click OK.
The wizard starts the software.
Activate later
If you do not want to activate your copy of the software when you start
it, click the Skip button.
Until you activate the software, you will see the HeartStart Activation
Wizard window each time that you start the software.
During the 60-day trial period, you can use the software and save your
work.
1 - Installing HeartStart Data Messenger Data Messenger user guide

2
Getting started
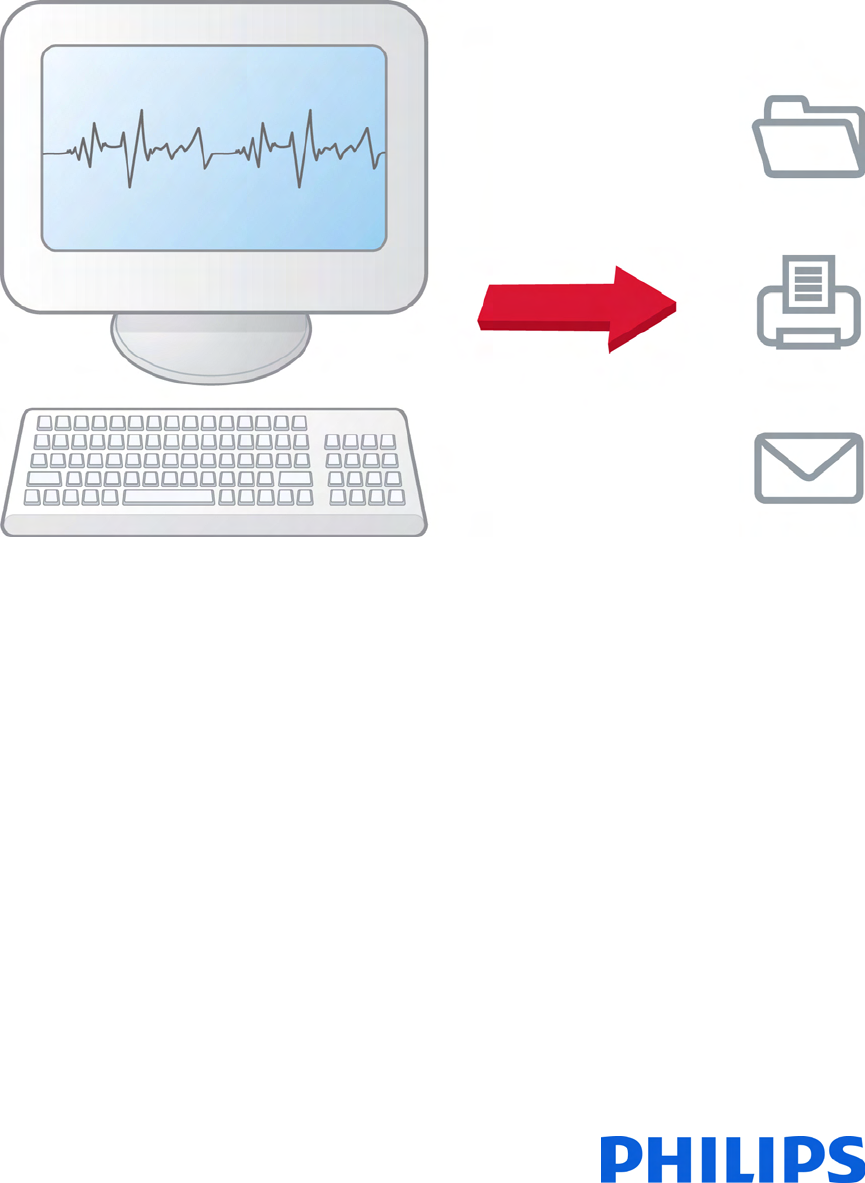
Philips HeartStart Data Messenger (Data Messenger) streamlines the
process of transferring patient data from Philips defibrillators. You can
use Data Messenger to view, print, email, and save patient data. Data
Messenger can also forward the data for retrospective quality review for
care decisions before the patient arrives to the hospital. This section
introduces you to some of the most common tasks.
Intended use
HeartStart Data Messenger forwards, monitors, and manages the
transfer of patient case data from defibrillators and AEDs to HeartStart
Event Review Pro, folders (local and network), printers, or email. Data
Messenger also forwards Periodic Clinical Data Transmission (PCDT) and
12-lead ECG data to a hospital Telemedicine System before patient
arrival. Data Messenger operates as an on-screen or background
application in either the Automatic mode or the Manual Process mode.
New in this release
This release of Data Messenger is updated with the following features:
• Support for data transfer from HeartStart FR3 AEDs with three lead
and QCPR.
Configuration
• Option to clear preset reference and institution information from a
transmission.
• Option to play a sound each time a case is received, processed, or
causes an error in Automatic mode.
• Option to clear out failed MRx transmission files.
• Option to copy failed MRx transmission files to a backup directory.
• Maximum number of retries for forwarding data to Event Review Pro
and Telemedicine changed to 99.
16

17
Manual Process mode
• The message "Please wait for cases to load" appears when cases
initially load in Manual Process mode.
• Option to display the Data Messenger Manual Process window in full
screen.
• Total numbers of cases, and number selected, display at bottom of
window.
• Option to delete cases from both the cases list and the source.
Automatic mode
• Notification window on task bar displays a scrolling list of incoming
case messages.
• Clicking in the notification window prevents the window from fading
out on your computer screen after seven seconds.
• Double-clicking in notification window starts Manual Process mode
and displays the System Log tab.
Document conventions
This document uses the following conventions to help identify
information.
A yellow box with a triangular caution icon and exclamation mark
identifies circumstances that can result in data corruption or
information loss.
A blue box with a note icon contains information on how features
are used.
A green box with a light bulb tip icon contains information to
complete a task.
How Data Messenger is used
HeartStart Data Messenger is a data-download and forwarding tool that
helps you get data off the defibrillator and forward it to the place that it
ultimately needs to go.
2 - Getting started Data Messenger user guide

18
Users in different healthcare situations use Data Messenger in a number
of different ways, based on their unique workflows and existing
infrastructure. For example, you can use Data Messenger in the
following ways:
• Download (to a computer) and print cases manually or
automatically.
• Transfer case data to HeartStart Event Review Pro for retrospective
review by your Medical Director.
• Transfer 12-lead reports or periodic clinical data to a receiving
hospital through the Internet before the patient arrives.
• Use Data Messenger on a tablet PC in the back of an ambulance to
transfer patient event-summary data automatically to a shared
network drive for use in a third-party application, or to transfer
patient data automatically to HeartStart Telemedicine.
• Automatically transfer the patient event summaries from the
HeartStart MRx at the end of the work shift.
Starting Data Messenger
Data Messenger does not place an icon on the desktop. To start Data
Messenger, use the shortcut on the Start menu or All Programs menu.
To start Data Messenger
1. Click the Windows Start button.
2. Click All Programs.
3. Click Philips HeartStart Data Messenger 4.3.
4. Click Data Messenger Manual Process.
5. Follow the on-screen instructions for the Philips HeartStart
Activation Wizard.
Data Messenger keeps track of the number of days before the trial
period expires. If you do not activate the software after the 60-day trial
period, Data Messenger reverts to the limited-feature version.
2 - Getting started Data Messenger user guide

3
HeartStart Data
Messenger features
Data Messenger supports Microsoft Windows XP running on x86 (32-bit),
and Microsoft Windows 7 running on x86 (32-bit) and x64 (64-bit)
computers.
Patient data includes patient cases from HeartStart AEDs and
monitor/defibrillators, as well as periodic clinical data, 12-lead reports,
vital signs, and trigger events from Philips advanced
defibrillator/monitors.
Understanding Data Messenger
transmissions
Data Messenger processes two types of data:
• Case data from a cardiac emergency that was collected by a
monitor/defibrillator or an automated external defibrillator (AED).
• Periodic clinical data that was recorded while a patient was
transported to a medical facility.
Data moves to Data Messenger using different methods for each
defibrillator product. Those methods include infrared connections, card
readers, USB drives, Bluetooth connections, and batch LAN data transfer
FTP.
The following table shows the data transfer methods used by supported
HeartStart defibrillators. Patient data may be transferred to HeartStart
Event Review Pro, printers, or email, or may be exported to a folder.
Supported
defibrillators Data transfer methods
HeartStart HS1 IrDA (infrared)
HeartStart FRx IrDA (infrared)
19

20
Supported
defibrillators Data transfer methods
HeartStart FR2 Data card
HeartStart FR3 Data card
Bluetooth
HeartStart XL Data card
HeartStart XL+ USB drive
HeartStart MRx
monitor/defibrillator
Bluetooth Data card
Ethernet cable
12-lead data also transferrable
through network/FTP
For information about a specific defibrillator, see Working with
defibrillators on page.65.
Planning your workflow
Philips recommends that you plan your data flow and requirements with
your IT department and data managers. During this time, determine
how you want to use Data Messenger in your workflow.
Use the Data management solutions implementation guide to help set up
Data Messenger, the network connections, and the environment.
For example, consider these questions:
• Do you want to print a case report?
• Do you want to transfer patient data from the Philips defibrillator to
a computer with Data Messenger installed?
• Do you want to transfer the cases manually or automatically?
• Do you want to transfer patient data to HeartStart Event Review Pro?
• Do you want to use a mobile device to monitor the transfer of patient
data to a destination?
3 - HeartStart Data Messenger features Data Messenger user guide

21
Data Messenger tasks
The default Data Messenger configuration allows you to receive patient
event-summary data once you connect to the defibrillator or its data
source, such as a data card.
You can print a case report, delete the patient data from Data
Messenger and its data source, or back up the data for future use. You
can also monitor Data Messenger activity.
At any time, you can change the default configuration to meet your
organization’s workflow. For example, after you customize the
configuration, you can use Data Messenger in the following ways:
• Download patient event-summary data, 12-lead reports, and
periodic clinical data from supported defibrillators.
• View and print the case report about the patient event-summary
data.
• Edit and forward (process) patient event-summary data manually.
• Save patient event-summary data to an external file (export).
• Edit patient-identification information, and then forward and print
reports.
• Forward 12-lead reports and periodic clinical data automatically.
• Monitor Data Messenger activity.
• Change the configuration for your organization’s workflow.
Overview
In Data Messenger, you can download defibrillator patient event-
summary data and print reports. You can also forward the patient event-
summary data to a shared network folder, to an email address, and to
Philips HeartStart Event Review Pro.
Patient event-summary data includes information recorded by the
supported defibrillators and patient information entered by a Data
Messenger user. These features help you to download patient event-
summary data for retrospective reviewing.
3 - HeartStart Data Messenger features Data Messenger user guide

22
Emergency Medical Services (EMS) systems can use Data Messenger to
transfer HeartStart MRx Monitor/Defibrillator (HeartStart MRx) 12-lead
ECGs (12-lead reports) or periodic clinical data to the hospital. This
allows hospital clinical staff to prepare before the patient arrives. In this
use model, Data Messenger transfers the data to the Philips HeartStart
Telemedicine System (HeartStart Telemedicine).
Data Messenger supports the following Philips defibrillator models:
• HeartStart FR3 Defibrillator (HeartStart FR3)
• HeartStart FR2 Defibrillator (HeartStart FR2)
• HeartStart FRx Defibrillator (HeartStart FRx)
• HeartStart HS1 Defibrillator, also known as the OnSite Defibrillator
and the Home Defibrillator (HeartStart HS1)
• HeartStart MRx
• HeartStart XL defibrillator
• HeartStart XL+ defibrillator
HeartStart Data Messenger is implemented in one of two ways:
• To operate openly on a computer in the Manual Process mode—users
interact with the data in Data Messenger to process the files. For
more information, see Processing cases manually on page.47.
• To operate in the background in the Automatic mode—Data
Messenger processes files automatically without your intervention.
For more information, see Processing cases automatically on
page.56.
Monitoring the transfer of event-summary data
Use the Cases tab on the Data Messenger Manual Process window to
complete the following tasks on a case-by-case basis:
• View the processing of cases.
• Open (import) a previously saved case.
• Forward selected cases manually to the preconfigured destinations.
• Edit patient identification information for the selected case.
• View the case report.
• Print the preconfigured report.
• Delete selected cases from Data Messenger and its data sources (the
defibrillator, a data card, the Bluetooth Inbox, or the FTP folder).
• Group and sort the data.
3 - HeartStart Data Messenger features Data Messenger user guide

23
Configuring Data Messenger workflow
You can use the Data Messenger Configuration window to configure Data
Messenger to meet your organization’s workflow. Configuration involves
completing the tabs on the window.
For more information, see Configuring HeartStart Data Messenger on
page.28.
Monitoring system activities
You can use the System Log tab on the Data Messenger Manual Process
window to monitor system activity and troubleshoot issues. The system
log includes a description of each action that Data Messenger completes.
For more information, see System Log messages on page.89.
Typical uses of Data Messenger
Data Messenger acts as a point of communication to transfer patient
data from a defibrillator to a destination. Data Messenger can receive
patient data through an infrared connection, a data card, FTP, or a
Bluetooth wireless connection.
Data Messenger can forward defibrillator data in two types of files:
• Original defibrillator data in a file with the .hic extension
• Original defibrillator data with patient and demographic data in a file
with the .mic extension
Data Messenger can forward patient data to the following destinations:
• Folder for exported files
• Email address
• Printer
• HeartStart Event Review Pro
• HeartStart Telemedicine
• Third-party application
When you forward a file to an email address, you can attach files with
the .hic, .mic, and .pdf file extensions. You can also password-protect
files with the .mic and .pdf extensions.
3 - HeartStart Data Messenger features Data Messenger user guide
24
When Data Messenger receives the event-summary data on the Cases
list, and processes it according to the configured workflow, the event-
summary data becomes a case.
A case is all the information relating to a specific patient
emergency. This includes information recorded by the supported
defibrillators as well as information entered by a user.
For information about setting up Data Messenger in combination with
other products, see the Data management solutions implementation
guide.
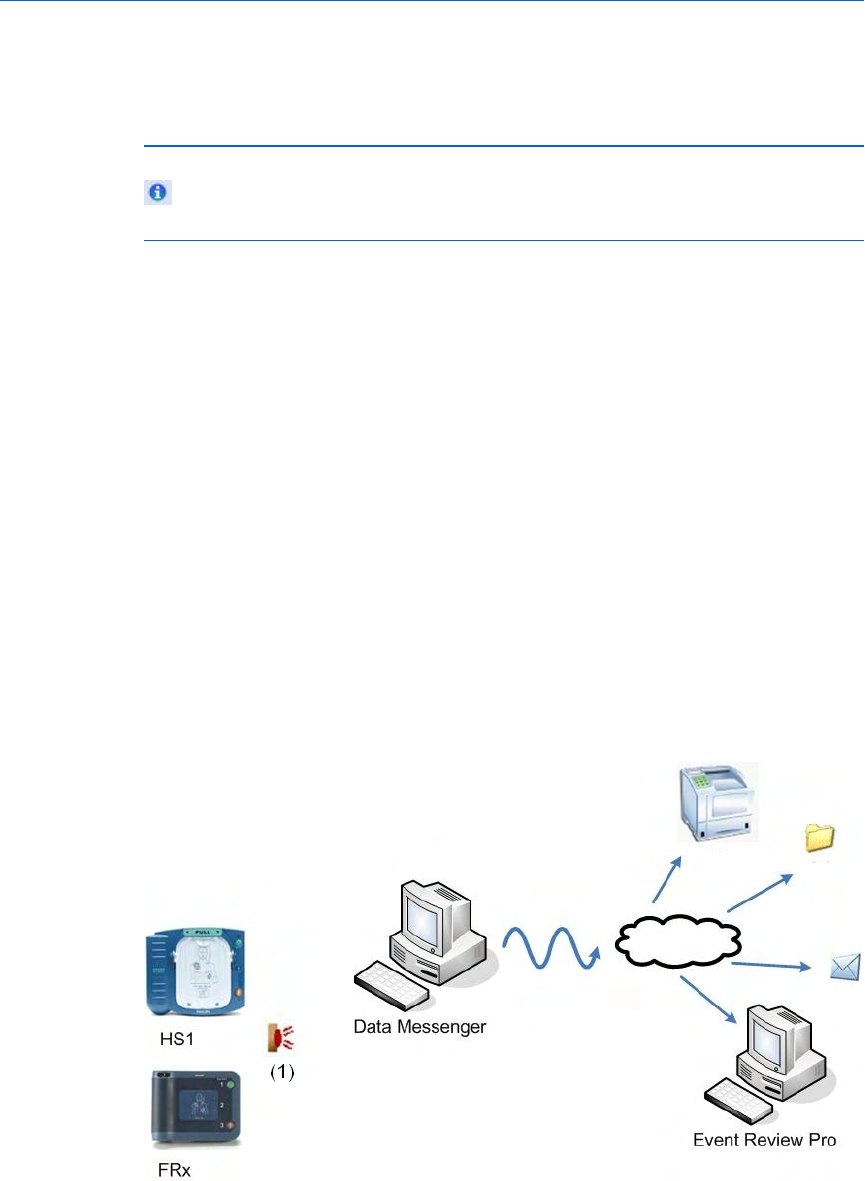
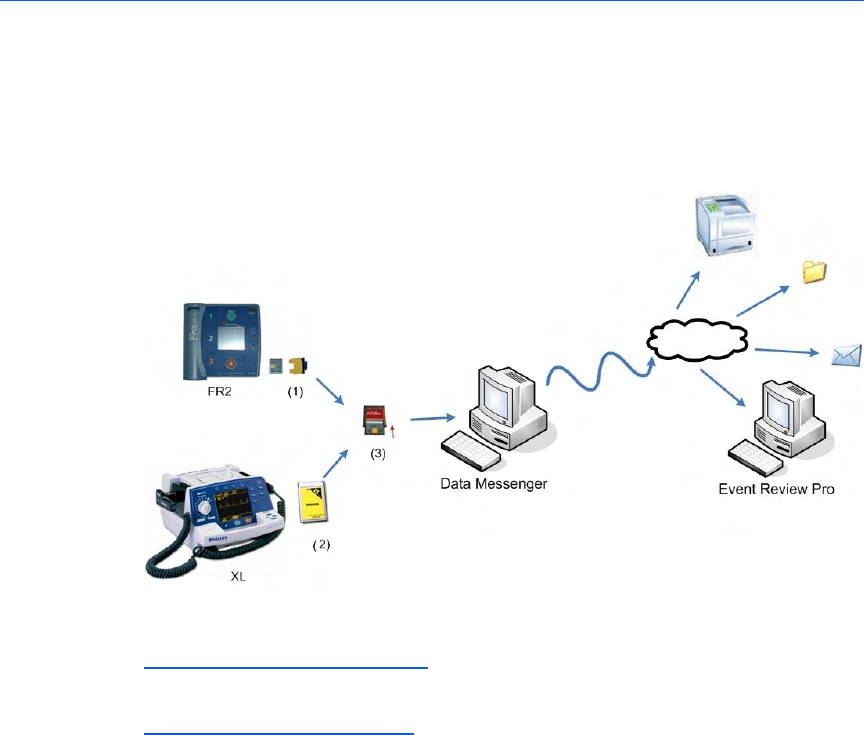
Uses with HeartStart HS1 and HeartStart FRx
The HeartStart HS1 and HeartStart FRx defibrillators forward cases
through an infrared transmission to Data Messenger.
Data Messenger can do the following:
• Send the data to a printer
• Save the data to a folder
• Email the data as a file with the .hic, mic, or .pdf extension
• Forward the data to Event Review Pro
The following illustration shows a sample configuration. The infrared
transmission appears at (1).
3 - HeartStart Data Messenger features Data Messenger user guide
25
For instructions on performing the HeartStart HS1 data transfer, see
Downloading HeartStart HS1 data on page.74.
For instructions on performing the HeartStart FR2 data transfer, see
Reading HeartStart FR2 data on page.71.
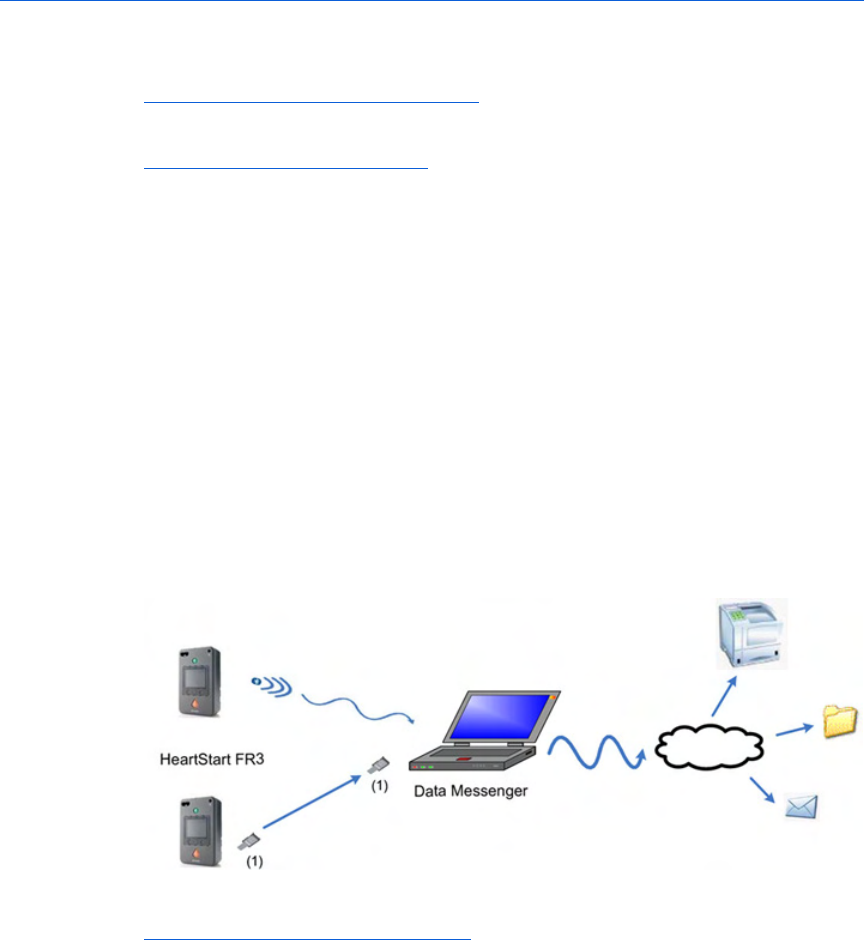
Uses with HeartStart FR3
The HeartStart FR3 AED defibrillators forward cases to Data Messenger
using two methods, Bluetooth transmission and data card transfer.
Data Messenger can do the following:
• Send the data to a printer
• Save the data to a folder
• Email the data as a file with the .hic, .mic, or .pdf extension
• Forward data to HeartStart Event Review Pro
The following illustration shows a sample configuration. The data card
transfer appears at (1).
For instructions on performing the HeartStart FR3 data transfer, see
Transferring HeartStart FR3 data on page.66.
Uses with HeartStart FR2 and HeartStart XL
The HeartStart FR2 and HeartStart XL defibrillators forward cases
through data cards and using the appropriate card adapter to Data
Messenger, as shown in the below figure.
Data Messenger can do the following:
• Send the data to a printer
• Save the data to a folder
3 - HeartStart Data Messenger features Data Messenger user guide
26
• Email the data as a file with the .hic, .mic, or .pdf extension
• Forward the data to Event Review Pro
The following illustration shows a sample configuration. The data cards
appear at (1) and (2), and the card adaptor appears at (3).
For instructions on performing the HeartStart FR2 data transfer, see
Reading HeartStart FR2 data on page.71.
For instructions on performing the HeartStart XL data transfer, see
Reading HeartStart XL data on page.1.
Uses with HeartStart MRx
The HeartStart MRx defibrillator forwards event-summary data and
periodic clinical data to Data Messenger using a data card, a Bluetooth
FTP connection, or an Ethernet cable.
Data Messenger can do the following:
• Send the data to a printer
• Save the data to a folder
• Email the data as a file with the .hic, .mic, or .pdf extension
• Forward the data to Event Review Pro
3 - HeartStart Data Messenger features Data Messenger user guide

27
The following illustrations show examples of possible configurations.
The data card appears at (1), the Bluetooth FTP connection appears at
(2), and the Ethernet Cable appears at (3).
The HeartStart MRx defibrillators forward 12-lead reports and periodic
clinical data to HeartStart Telemedicine using Bluetooth FTP.
For instructions on performing the HeartStart MRx data transfer, see
Working with HeartStart MRx data on page.76.
3 - HeartStart Data Messenger features Data Messenger user guide

4
Configuring
HeartStart Data
Messenger
You can customize the HeartStart Data Messenger workflow for your
organization. The workflow specifies how Data Messenger receives,
manages, prints, and saves cases (called “processing” cases).
This section describes how to manage your workflow, and edit and
transfer cases. It also includes information for advanced life-support
users who forward 12-lead reports, vitals, and trigger events. The
configuration settings determine how Data Messenger operates in both
the Automatic and Manual Process modes.
When you start Data Messenger and click Data Messenger Configuration,
the Data Messenger Configuration window appears. Use this window to
set up the Data Messenger workflow. Make sure that you review the
default configuration settings on the Data Messenger Configuration
window before customizing the settings.
On the Data Messenger Configuration window, you can specify how Data
Messenger transfers patient data from the supported defibrillators to
destinations such as a printer, a folder, an email address, HeartStart
Event Review Pro, or HeartStart Telemedicine. You can also set up Data
Messenger to operate automatically without your intervention.
If you have HeartStart FR3 defibrillators with Bluetooth wireless
technology, and multiple instances of Data Messenger running in
close range, then configure all instances with the same reference
ID and institution. This way, no matter which instance is detected,
the patient data is processed, labeled, and routed in the same
fashion.
28

29
Using the Data Messenger
Configuration window
You can use the Data Messenger Configuration window to change the
Data Messenger settings at any time to meet your organization’s
workflow. Each user can have a different configuration.
When performing configurations involving connection to a
destination using a URL, be sure to verify the URL before working
with actual cases. Incorrect connection information may result in
delay of data transfer.
The following illustration describes the Data Messenger Configuration
window.
4 - Configuring HeartStart Data Messenger Data Messenger user guide

30
Number Description
1 The toolbar displays the actions that you can complete manually.
2 The tabs display settings for configuration parameters. Complete the
appropriate settings on each tab to customize the configuration for
your organization. Data Messenger uses these settings when it
operates in both the Automatic and Manual Process modes.
3 In this area, you type entries in text fields, check boxes, or click
option buttons that specify a setting.
4 - Configuring HeartStart Data Messenger Data Messenger user guide

31
The Data Messenger Configuration window includes the following tabs
that you can use to customize your configuration:
General tab
• Specify the case identifiers to add to patient event-summary data.
• Clear preset reference and institution information from a
transmission.
• Set the Automatic mode to start at logon.
• Generate notifications when data is forwarded in the Automatic
mode.
• Display a confirmation message when a case is manually removed in
the Manual Process mode.
• Set the number of days that Data Messenger stores System Log
messages.
Case Workflow tab
• Export case data to a folder.
• Print reports. Full Disclosure and Pre-and Post-shock reports
become available for selection on the Report tab.
• Email case data. Options for how to forward attachments become
available on the Email tab.
• Forward case information to Event Review Pro.
• Erase source data from a device.
• Back up processed case files.
Advanced Inboxes tab
• Choose the folder where Data Messenger receives Bluetooth and
Batch LAN data transfer FTP.
• Configure FTP information for use with the HeartStart MRx.
• Clean up incomplete transmissions.
• Back up incomplete transmissions.
Advanced Workflow tab
Use this to select each action that you want Data Messenger to perform
for each 12-lead report or periodic clinical data received from
HeartStart MRx.
4 - Configuring HeartStart Data Messenger Data Messenger user guide

32
Opening the Data Messenger Configuration
window
Use the Data Messenger Configuration window to change the default
configuration settings.
In the default workflow, Data Messenger operates in the Manual Process
mode.
When you open the Data Messenger Configuration window with Data
Messenger in the Automatic mode, the software interrupts the
processing of incoming data until you close the Configuration
window. Processing continues automatically once the window is
closed.
To open the Data Messenger Configuration window
1. On the Windows Start menu, click All Programs.
2. Click Philips HeartStart Data Messenger 4.3.
3. Click Data Messenger Configuration.
The General tab on the Data Messenger Configuration window
appears. Processing of all patient data (cases, 12-lead reports, and
periodic clinical data) is interrupted until you close the window.
Only the system administrator can access all the tabs on this
screen. All the tabs except the General tab are grayed out for all
other users. The system administrator is responsible for completing
the information on all the tabs. However, any other user can change
information on the General tab.
Closing the Data Messenger Configuration
window
Click the Close button on the Data Messenger Configuration window
to end the configuration session.
One of the following occurs, depending on the configuration you set up:
• In Manual Process mode, the window closes.
4 - Configuring HeartStart Data Messenger Data Messenger user guide

33
• In Automatic mode, the window closes and patient data continues to
process automatically. The Data Messenger icon appears in the
notification area.
Setting up Data Messenger
preferences
Before you begin using Data Messenger, use the General tab to choose
from the following settings:
• Specify the case identifiers to add to patient event-summary data.
• Clear preset reference and institution information from a
transmission.
• Set the Automatic mode to start when you log on.
• When data is forwarded in the Automatic mode, set the notifications
that are sent.
• For each type of notification sent in Automatic mode, set a sound to
play.
• In the Manual Process mode, send a confirmation message when a
case is manually removed.
• Set the number of days that Data Messenger stores system log
messages and backup files.
Configuring Data Messenger to process cases in
the Automatic mode
In the default workflow, Data Messenger operates in the Automatic
mode. On the General tab, you can set up Data Messenger to use or
disable the Automatic mode.
In the Automatic mode, Data Messenger processes the patient event-
summary, the 12-lead report, or periodic clinical data automatically
without your intervention. When you open Data Messenger in Manual
Process mode, automatic processing is interrupted until you close
Manual Process mode.
To configure Data Messenger to process patient data
automatically
1. In the Data Messenger Configuration window, click the General tab.
4 - Configuring HeartStart Data Messenger Data Messenger user guide

34
2. Under Automatic Mode, check the Always Start Data Messenger
at Logon box.
Under Select the Feedback that You Want to Receive When Data
Messenger Forwards Data Automatically, three checkboxes become
available. If you want to change these settings, see Controlling
feedback messages on page.36.
3. On the toolbar, click Apply.
4. Click the Close button.
In the notification area, the Data Messenger icon appears. This
icon appears only when you are in the Automatic mode.
For information about the menu available from the Data Messenger
icon, see Using the Data Messenger icon in the notification area on
page.57.
To test the Automatic mode setup
1. From the Windows Start menu, click Log Off.
Some versions of Windows ask you to verify this action.
2. Click Log Off.
3. Log on to the computer.
4. Verify that the Data Messenger icon appears in the notification
area.
To turn off the Automatic mode
1. In the Data Messenger Configuration window, click the General tab.
2. Under Automatic Mode, check the Always Start Data Messenger
At Logon box to clear the selection.
3. On the toolbar, click Apply.
4. Click the Close button on the Data Messenger Configuration
window.
Adding default case identifiers
If you want to associate cases with a specific organization, response
teams, or apparatus, do this on the General tab.
4 - Configuring HeartStart Data Messenger Data Messenger user guide

35
When your defibrillator does not already provide reference ID and
institution information (as in the case of the AEDs), use the fields under
Default Case Identifiers on the General tab to add them.
Data Messenger overrides the reference ID and institution information
in the defibrillator when the “Always override preset reference id” box
and the “Always override preset institution” box are both checked.
To add default case identifiers
1. On the Data Messenger Configuration window, click the General
tab.
2. Do one of the following:
• To use the Reference ID and Institution from the device, make
sure that the “Always Override Preset Reference ID” and “Always
Override Preset Institution” boxes are unchecked. If the
Reference ID and Institution have already been entered, the
Reference ID and Institution on the device will override the
information on the screen.
• To use a Reference ID and Institution of your choice, type a
Reference ID and Institution in the Reference ID and Institution
fields and make sure that the “Always Override Preset Reference
ID” and the “Always Override Preset Institution” boxes are
checked.
3. On the toolbar, click Apply.
Storing System Log messages and backup files
Use the General tab to set how long Data Messenger stores System Log
messages and backup files.
In the default workflow, Data Messenger saves the System Log
messages and backup files for seven days.
To modify how long Data Messenger stores System Log
messages and backup files
1. On the Data Messenger Configuration window, click the General
tab.
4 - Configuring HeartStart Data Messenger Data Messenger user guide

36
2. Under Cleanup System Messages and Backup Folders, in Days, type
the number of days you want Data Messenger to saves system
messages and files in the backup folders. These files consist of
processed, unprocessed cases, 12 lead, and PCDT (Periodic Clinical
Data Transmission) files.
The default setting is seven days. The maximum setting is 365 days.
After the set number of days, Data Messenger clears or deletes older
System Log messages and backup files.
3. On the toolbar, click Apply.
Use the volume of patient data your organization receives to
determine the number of days that Data Messenger will store
system log messages and backup files. For example, look at the
size of the System Log folder and the backup folders after a week of
typical processing. Use that size to estimate the required storage
capacity. Keep in mind that a large number of stored messages can
slow the display of messages.
Controlling feedback messages
Use the settings on the General tab if you want notification messages
sent after cases are received or processed while in Automatic mode.
You can also choose to have a confirmation message appear when
manually removing a case in Manual Process mode.
Feedback in Automatic mode
When Data Messenger operates in the Automatic mode, you can choose
to receive feedback messages in the notification area. Three
notifications are available:
• Notification of Data Received
• Notification of Data Processed
• Notification of an Error Encountered
To control the feedback that you receive when in Automatic
mode
1. In the Data Messenger Configuration window, click the General tab.
2. In the Automatic Mode section, check the Always Start Data
Messenger at Logon box.
Three checkboxes become available. In the default workflow, they
are all checked.
4 - Configuring HeartStart Data Messenger Data Messenger user guide

37
3. On the General tab, in the Automatic Mode section, check any or all
of the following boxes depending on the type of feedback that you
want to receive:
• Notification of Data Received
• Notification of Data Processed
• Notification of an Error Encountered
4. If you want a sound to play when a notification occurs, check the box
underneath the notification.
5. On the toolbar, click Apply to save the settings.
Feedback in Manual Process mode
When Data Messenger operates in the Manual Process mode, you can
choose to display a confirmation message when you delete a case
asking you to confirm the deletion. In the default workflow, this option
is selected.
To receive confirmation messages when deleting cases
1. On the General tab, in the Manual mode section, check the Display
a Confirmation Message When Manually Removing a Case
box.
2. On the toolbar, click Apply to save the settings.
For more information, see Processing cases manually on page.47.
Modifying the workflow for case
processing
Use the Case Workflow tab to choose the tasks that you want Data
Messenger to perform when processing a case. You can select the
following actions:
• Export case data to save as a file.
• Print case report on the default printer.
• Email case data to the preconfigured email address as an
attachment.
• Forward case data to Philips HeartStart Event Review Pro.
• Erase source data from the defibrillator or its data source, either a
data card or the Bluetooth folder.
• Back up processed case files on the Data Messenger computer.
4 - Configuring HeartStart Data Messenger Data Messenger user guide

38
Data Messenger can transfer patient event summaries to a folder, Event
Review Pro, or a third-party application. Cases can be exported in either
of the following formats:
• .mic – designates a file for use in Philips software products. A .mic
file contains device data supplemented with patient data. It is
intended for review within Data Messenger or software products
such as HeartStart Event Review Pro after a medical emergency.
• .hic – designates a file for use in a third-party application. A .hic file
contains device data and reference ID information.
To export cases to a folder
1. In the Data Messenger Configuration window, click the Case
Workflow tab.
2. Check the Export Case Data to a Folder box.
3. Do one of the following:
• In Folder Path, type the path for the folder.
• Click Browse to navigate to the folder. In the Browse for Folder
window, click the location and click OK.
4. In Export Format, check the .mic or the .hic box.
5. On the toolbar, click Apply.
To forward cases to HeartStart Event Review Pro
1. Check the Forward Case Data to HeartStart Event Review Pro
box.
2. In URL, type the URL address for HeartStart Event Review Pro.
3. Click the Verify button to test that the URL is correct and accessible.
4. In Number of Retries, type the number of times that Data Messenger
will attempt to forward the cases in the event of a failed transfer.
The default is three attempts.
5. In Interval, type the number of minutes between each retry. The
default is 60-minute intervals.
6. On the toolbar, click Apply.
To set up a backup folder for cases
1. Click Back Up Processed Case Files.
2. Do one of the following:
4 - Configuring HeartStart Data Messenger Data Messenger user guide

39
• In Folder Path, type the path for the folder location. The default
folder is: C:\Document and Settings\Administrator\My
Documents
• Click Browse to navigate to the folder location. In the Browse
for Folder window, click the location and click OK.
Using reports
Use the Report tab to choose the type of report that Data Messenger
automatically sends to the printer or an email address. Report options
include:
Full Disclosure report - includes the entire incident, including all the
events recorded on the ECG. In the default workflow, Data Messenger
generates the Full Disclosure report.
Pre- and Post-shock report - documents just the key ECG waveform
segments and their associated events. The report displays the
presenting rhythm, closing rhythm, and the ECG before and after each
shock delivered. You can set the length of the presenting rhythm and the
time bracketing the shock events on the Data Messenger Configuration
window.
Your printer must be a Postscript-compatible printer on the same
network as the computer that runs Data Messenger. The printer
must also be configured on your computer as the default printer.
To specify the report to print or email
1. In the Data Messenger Configuration window, click the Case
Workflow tab.
2. Check the Print Case Report box.
3. Click the Report tab.
4. Do one of the following:
• Check the Full Disclosure Report box.
• Check the Pre- and Post-Shock Report box.
5. On the toolbar, click Apply.
If you checked Pre- and Post-Shock Report, type the number of seconds
to display for the following segments in the report:
• Presenting Seconds—waveforms at beginning of ECG waveform
• Closing Seconds—waveforms at the end of the ECG waveform
• Pre-Shock Seconds—time before each shock administered
4 - Configuring HeartStart Data Messenger Data Messenger user guide

40
• Post-Shock Seconds—time after each shock administered
Setting up the email case data feature
Use the Email tab to choose how you will send cases to a specified email
address.
You can assign a password to an attached case. Make sure to
communicate the password to your intended recipient.
To set up the email case data feature
1. In the Data Messenger Configuration window, click the Case
Workflow tab.
2. Check the Email Case Data box.
3. Click the Email tab.
4. In the Email template area, type the email address, and then click
the plus button to add the address.
5. In Cc, type the email address, and then click the plus button to add
the address.
6. To remove an email address, click the address and then click the
minus button.
7. Complete the subject and body.
8. In the Attachment Format area, click any or all of the file formats to
email.
9. Check the Password Protection box if needed and type a
password in Password To Use.
10. On the toolbar, click Apply.
Specifying inboxes for HeartStart MRx
data
The HeartStart MRx configuration functions that follow are only for
advanced users.
An inbox is a location where Data Messenger retrieves HeartStart MRx
data when the defibrillator uses the Bluetooth and batch LAN data
transfer FTP methods.
4 - Configuring HeartStart Data Messenger Data Messenger user guide

41
Use the Advanced Inboxes tab to specify this location. Data Messenger
monitors the inbox locations for event summaries, 12-lead reports, and
periodic clinical data.
In the default workflow, Data Messenger does not have an inbox
location configured
To clean up incomplete transmission check the Clean Up Incomplete
Transmission box.
Setting up a Bluetooth inbox for the HeartStart
MRx
To transfer data from a defibrillator to Data Messenger, you must first
install the Bluetooth hardware and software. The Bluetooth stack that
comes with the hardware includes drivers that define an inbox location
where files are transferred.
The Bluetooth stack needs to support the Bluetooth FTP server
profile so that HeartStart MRx can send files to the server.
To set up the Bluetooth inbox
1. In the Data Messenger Configuration window, click the Advanced
Inboxes tab.
2. In the Bluetooth section, do one of the following:
• In Folder path, type the path of the Bluetooth Exchange Folder.
• Click Browse to navigate to the Bluetooth Exchange Folder. In
the Browse for Folder window, click the location and click OK.
3. On the toolbar, click Apply.
Setting up batch LAN data transfer for the
HeartStart MRx
The HeartStart MRx device can transfer event summaries across a LAN
to a computer that runs Data Messenger.
4 - Configuring HeartStart Data Messenger Data Messenger user guide

42
To transfer event summaries to Data Messenger, your computer must
have the FTP Server software installed. Your IT department can install
the Windows FTP Server profile, which can be found in the Windows
Installation CD. Alternatively, you can use a third-party FTP server.
When a HeartStart MRx connects to the network, it initiates an IP
address request from the network. The IP address is needed to send
files to the computer that is running Data Messenger. During the batch
LAN data transfer process, HeartStart MRx queries the local subnet for
the computer.
To set up an inbox folder location for batch LAN data transfer
1. In the Data Messenger Configuration Window, click the Advanced
Inboxes tab.
2. In the Batch LAN Data Transfer FTP section, do one of the following:
• In Local Folder Path, type the path for the FTP inbox folder.
• Click Browse to navigate to the FTP inbox folder. On the Browse
for Folder window, click the location and click OK.
3. In FTP Address, type the IP address or name of the FTP server.
4. In Port, type the number of the port. The default port number is 21.
5. In User Name, type the user name with read/write access to the FTP
server.
6. In Password, type the password for the user.
7. In Base directory, type the directory where HeartStart MRx transfers
the files on the FTP server. You typed the same directory in the Local
Folder Path. The default entry is a forward slash (/).
8. Click Verify to test that the FTP connection is correct and
accessible.
9. On the toolbar, click Apply.
Cleaning up incomplete transmissions
When the HeartStart MRx retransmits files, it leaves the transmitted
files from the failed transmission in the folder that you specify on the
Advanced Inbox tab on the screen. Over time, incomplete transmissions
can accumulate and take up considerable space.
4 - Configuring HeartStart Data Messenger Data Messenger user guide

43
Checking the Clean Up Incomplete Transmissions box at the bottom of
the Advanced Inboxes tab enables Data Messenger to clean up these
files. You can specify the number of days to wait before cleaning up an
incomplete transmission and choose a folder to back up these files.
To clean up the incomplete transmissions folder
1. In the Data Messenger Configuration window, click the Advanced
Inboxes tab.
2. At the bottom of the window, check the Clean Up Incomplete
Transmission box.
3. In Days, type the number of days to wait before cleaning up
incomplete transmissions.
4. If you want to back up the incomplete transmissions, check the
Back Up Incomplete Transmissions box.
Specifying advanced workflow for the
HeartStart MRx
Use the Advanced Workflow tab to choose settings for the following
actions:
• Forwarding 12-lead reports and periodic clinical data from the
HeartStart MRx to HeartStart Telemedicine
• Erasing source data
• Backing up transmissions that failed to process
In the default workflow, Data Messenger selects the Erase Source Data
option.
To forward 12-lead reports or periodic clinical data to
HeartStart Telemedicine
1. In the Data Messenger Configuration window, click the Advanced
Workflow tab.
2. Check the Forward to Philips HeartStart Telemedicine
System box.
3. In the URL field, type the URL address for HeartStart Telemedicine.
4. Click Verify to test that the URL information is correct.
4 - Configuring HeartStart Data Messenger Data Messenger user guide

44
5. In Number of Retries, type the number of times that Data Messenger
will attempt to transfer the 12-lead report or periodic clinical data.
The default is three attempts.
6. In Interval, type the number of minutes between each attempt. The
default is 60 minutes.
HeartStart Telemedicine does not require a HTTP username and
password for the data it receives from Data Messenger. It accepts
anonymous transmissions.
To erase source data from Data Messenger and its data source
Check the Erase Source Data box.
To set up a backup folder for failed transmissions
1. Check the Back Up Failed Transmissions box.
2. Do one of the following:
• In Folder Path, type the path for the folder location.
• Click Browse to navigate to the folder location. In the Browse
for Folder window, click the location and click OK.
To save the settings
On the toolbar, click Apply.
Managing configurations in Data
Messenger
Data Messenger provides toolbar buttons to manage configurations. You
can save, export, and import configurations. This is useful when you
want to configure multiple instances of Data Messenger in the same way
throughout your organization.
Once you apply a configuration, you can export that configuration for
use as a backup copy or on other Data Messenger installations.
Before using Data Messenger to manage actual cases, test the Data
Messenger configuration. An incorrect configuration may result in
delay of data transfer. For resources, see Implementation
references on page.109.
4 - Configuring HeartStart Data Messenger Data Messenger user guide

45
Saving configurations
The Data Messenger toolbar appears at the top of the Data Messenger
Configuration window, above the tabs.
To save Data Messenger configurations
1. On the Data Messenger Configuration window toolbar, click the
Apply button.
Data Messenger displays a message when the configuration is
saved.
2. Click OK.
3. In the Data Messenger Configuration window, click the Close
button to start using the configuration.
Importing configurations
The Data Messenger toolbar appears at the top of the Configuration
window, above the tabs.
To import Data Messenger configurations
1. In the Configuration window, on the toolbar, click the Import
button to load the configuration.
The Open window appears.
2. Navigate to the folder that contains the configuration file.
3. Do one of the following:
• Double-click the configuration file.
• In File Name, type the name of the configuration file, and then
click Open.
4. On the Data Messenger Configuration window toolbar, click the
Apply button.
Data Messenger displays a message when the configuration is
saved.
5. Click OK.
4 - Configuring HeartStart Data Messenger Data Messenger user guide

46
6. In the Data Messenger Configuration window, click the Close
button to start using the configuration.
Exporting configurations
The Data Messenger toolbar appears at the top of the Data Messenger
Configuration window, above the tabs.
To export Data Messenger configurations
1. In the Data Messenger Configuration window, on the toolbar, click
the Export button to save the new configuration to a file.
Data Messenger displays the Save As window.
2. Navigate to the folder where you want to store the configuration file.
3. In File Name, type the name of the configuration file.
4. Click Save.
Data Messenger saves the configuration file.
4 - Configuring HeartStart Data Messenger Data Messenger user guide

5
Processing cases
manually
When you transfer data from a defibrillator, data card, or USB drive to
Data Messenger, the patient event-summary data displays on the Cases
list on the Data Messenger Manual Process window.
After Data Messenger receives the patient summary data, the data is
known as a case. You can then use Data Messenger to process the
cases. The term "processing cases" refers to editing, saving, and
generating reports, and forwarding cases.
This section describes in more detail the tasks you can perform when
processing cases in Manual Process mode.
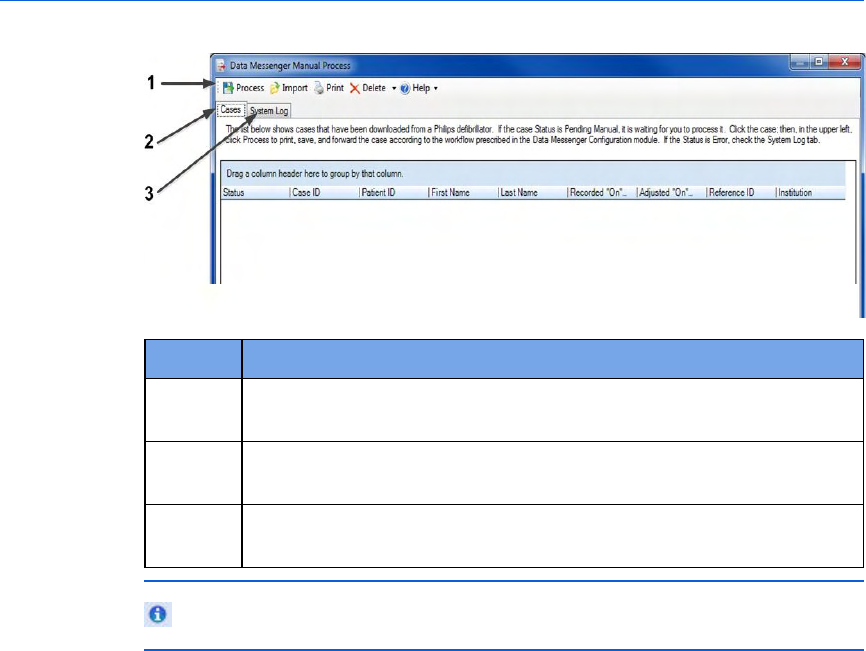
Using the Data Messenger Manual
Process window
The Data Messenger Manual Process window includes a toolbar, the
Cases tab, and the System Log tab. Click the Maximize button to display
the window in full screen.
Use the toolbar buttons to manage one or more cases, manually process
the case, and use the online Help.
Use the Cases tab to edit case identification information and process the
selected case according to the workflow that you configured. A case
includes all the information relating to a specific patient cardiac
emergency. This includes information recorded by the supported
defibrillators as well as information entered by a user.
Use the System Log tab to view a running log of system activities.
You can change how the data displays in each tab. For more
information, see Grouping entries on page.62.
The following illustration describes the Data Messenger Manual Process
window.
47
48
Number Description
1 The toolbar displays buttons for actions that you can complete
manually.
2 The Cases tab lists the data that you can use in the Manual Process
mode.
3 The System Log tab displays System Log messages associated with
case processing.
Data Messenger interrupts the automatic processing of cases until
you close the Data Messenger Manual Process window.
Opening the Data Messenger Manual Process
window
You can open the Data Messenger Manual Process window from the Start
menu or the notification area on the Windows task bar.
To open the Data Messenger Manual Process window from the
Start menu
1. On the Windows Start menu, click All Programs.
2. Click Philips HeartStart Data Messenger 4.3.
3. Click Data Messenger Manual Process.
Data Messenger displays the Data Messenger Manual Process
window.
To open the Data Messenger Manual Process window when in
the Automatic mode
1. In the notification area on the Windows task bar, right-click the Data
5 - Processing cases manually Data Messenger user guide
49
Messenger icon.
2. Click Manual Process.
Data Messenger displays the Data Messenger Manual Process
window.
When you close the Manual Process window, the system resumes
operating in the Automatic mode.
Closing the Data Messenger Manual Process
window
Whenever you close Manual Process mode, you are asked how to handle
unprocessed cases on the Cases tab.
Once the case appears in the Manual Process window, the only way
it can be processed is manually. Even if you return to Automatic
mode, these cases will not automatically process.
To close the Data Messenger Manual Process window
1. Click the Close button.
A message appears asking if you want to process cases that are
pending manual processing.
2. Do one of the following:
• Click Yes to process all the cases and close the window. The
Data Messenger application closes.
• Click No to keep the cases on the Cases tab and close the
window. You can process the cases manually later.
• Click Cancel to return to the Cases tab.
Receiving cases
Depending on the defibrillator, you can receive data through an infrared
transmission, Bluetooth transmission, Ethernet cable, data card, or USB
drive.
5 - Processing cases manually Data Messenger user guide

50
To receive data, you typically put the defibrillator into administration or
data management mode, unless you are transferring data manually on a
data card or USB drive. The methods vary by defibrillator. For more
information, see Working with defibrillators on page.65 and your
defibrillator documentation.
Once you establish a connection between the defibrillator and Data
Messenger, the software displays all the cases on the defibrillator or its
data source on the Cases tab. When the cases are initially loading, a
message appears asking you to wait for the cases to load. This message
disappears after all the cases are loaded.
Viewing cases
Use the Cases tab to view cases that Data Messenger receives from
supported defibrillators or case files that you import (open) in Data
Messenger. The total number of cases and the number selected display
at the bottom of the cases list.
Depending on your workflow, you can also use the Cases tab to print
case reports and email, forward, and export (save) cases. You can also
delete selected cases from Data Messenger or its data source (the
defibrillator, data card, USB drive, or Bluetooth folder).
When you delete data, you cannot restore or recover the data from
the computer or defibrillator. To prevent data loss, ensure that your
configuration is set to back up files. For information about backing
up processed case files, see Modifying the workflow for case
processing on page.37.
On the Cases tab, you can customize the way information appears on
the Cases window. You can also change how columns display (Working
with columns on page.61), and sort and group the list (Sorting entries in
a column on page.62, Grouping entries on page.62).
Selecting cases
To work on cases, click a case row on the Cases tab. You can select
more than one case at a time to complete the following tasks:
• View and print the default report for selected cases
• Process the selected cases according to the configured workflow
5 - Processing cases manually Data Messenger user guide

51
• Delete the selected cases from Data Messenger and its data source
(the defibrillator, data card, USB drive, or Bluetooth folder)
To select one case
On the Cases tab, click the case.
To select more than one consecutive case
1. On the Cases tab, click the first case.
2. Press and hold SHIFT, and click the last case that you want to select.
To select one or more cases that are not next to each other
1. On the Cases tab, click the first case.
2. Press CTRL and click each additional case that you want to select.
Editing cases
On the Cases tab, you can edit the following information for each
selected case:
Column heading Description
Case ID Identifies the patient event-
summary file. Maximum length is 25
characters.
Patient ID Identifies the patient. Maximum
length is 100 characters.
First Name Patient’s first name. The first name
appears in the case and prints in
report headers. Maximum length is
50 characters.
Last Name Patient’s last name. The last name
appears in the case and prints in
report headers. Maximum length is
50 characters.
Adjusted “On” Time Adjusts the data date and time based
on the clock of the Data Messenger
computer. If the defibrillator clock
was not synchronized, you can
adjust the time here. This does not
change the defibrillator.
5 - Processing cases manually Data Messenger user guide

52
Column heading Description
Case Date and Time Date and time that Data Messenger
receives the case.
Reference ID Identifies the case using a
meaningful naming convention. For
example, Engine 3 or Smithtown
High School Gym. Maximum length is
100 characters.
Institution Identifies organization or system
where a case originates. For
example, Johnstown Fire
Department or Smithtown School
District. Maximum length is 100
characters.
If Data Messenger receives a case from HeartStart MRx that includes
patient ID, first and last name, reference ID, and institution, this
information appears on the Cases tab.
If a defibrillator does not provide the above information, Data
Messenger uses the information entered under the Default Case
Identifiers section on the General tab of the Data Messenger
Configuration window. For more information, see Adding default case
identifiers on page.34.
You can edit this information on the Cases tab of the Data Messenger
Manual Process window.
To edit case information
1. On the Cases tab, identify the case to edit.
2. Double-click the field to type or edit the information in the drop-
down field.
Viewing and printing a case report
Use the Print button on the toolbar to view and print the Full
Disclosure report.
This report includes the entire incident, including the events recorded.
The continuous ECG is intended only for basic rhythm identification. It is
not intended for diagnostic and ST-segment interpretation.
5 - Processing cases manually Data Messenger user guide

53
To print the report
1. In the Data Messenger Manual Process window, click the case that
you want to print.
2. On the toolbar, click the Print button.
Data Messenger displays a preview of the report.
3. To print the report, use one of the following Report Preview toolbar
buttons:
• Click Print to print the report on the printer of your choice.
• Click Quick Print to print the report on your default printer.
Opening saved cases
On the Data Messenger Manual Process window toolbar, use the Import
button to open a saved case that has the .mic or .hic extension.
A .mic file contains patient and device data. It is intended for review in
Data Messenger or for importing into Event Review Pro as a case. A .hic
file contains device data and reference ID data. It is intended for
transfer to a third-party application.
If you import (open) a case with the .mic extension from HeartStart
Event Review Pro, Data Messenger imports only defibrillator data. It
does not import patient information. If you then import the case back
into HeartStart Event Review Pro, the file is processed as a new case.
If you import a case with the .mic extension from a previous version of
Data Messenger, all the information is imported into the current version.
To import a case
1. On the Data Messenger Manual Process window toolbar, click the
Import button.
The Data Messenger Manual Import window appears.
2. Navigate to the folder location containing the file.
3. Click the button above the Open button to choose the type of file to
import.
4. Click the file to import.
The filename appears in the File Name field.
5. Click Open.
5 - Processing cases manually Data Messenger user guide

54
If a .mic file is password-protected, a message appears requesting
the password. Type the password and click OK. The case is listed on
the Cases tab.
Processing cases
The way a case is processed (such as printing, forwarding, forwarding,
and emailing) is determined by how the workflow is configured. For
information about setting up workflow, see Modifying the workflow for
case processing on page.37.
Use the Process button on the toolbar to process the cases that you
select on the Cases tab. The Process function prepares and forwards the
case by completing the configured workflow actions.
To process cases
1. In the Data Messenger Manual Process window, click the case to
process. For more information, see Selecting cases on page.50.
2. On the toolbar, click the Process button.
Data Messenger processes the selected cases, changes the status on the
Cases tab, and removes the row from the Cases window if the
processing is successful. Data Messenger also lists the actions on the
System Log tab.
If Data Messenger is in Automatic mode when you open the Data
Messenger Manual Process window, automatic processing of data
stops until you close the window. Data that is received while in
Manual Process mode remains in the Manual Process mode. When
you close the Manual Process window, Data Messenger resumes
automatic processing.
Deleting cases from Data Messenger
Use the Delete button on the toolbar to delete data that is already
downloaded, or data that you do not want to process.
When you delete data, you cannot restore or recover the data from
the computer or defibrillator.
5 - Processing cases manually Data Messenger user guide

55
To delete cases from Data Messenger
1. In the Data Messenger Manual Process window, click the cases to
delete.
2. Do one of the following:
• On the toolbar, click Delete to delete cases from the window list
and the device source.
• On the toolbar, click the down arrow on the Delete button, and
then click From List Only to delete cases only from the window
list.
• On the toolbar, click the down arrow on the Delete button, and
then click From List and Source to delete cases from the
window list and the device source.
A message appears asking you to confirm the deletion. Data
Messenger removes the case from the list on the Cases window
and lists the actions on the System Log tab.
Deleting cases from defibrillators or
their data sources
Data Messenger processes all event-summary data for the associated
defibrillator before deleting the data on the defibrillator or its data
source (except for the HeartStart FR3 using Bluetooth and any infrared-
enabled defibrillators).
Data Messenger can delete the data from the following sources:
• HeartStart HS1, FRx, and FR3 defibrillators
• Data cards that are connected to the Data Messenger computer
• The Bluetooth inbox on the Data Messenger computer
• Source data in the FTP folder
Procedures for deleting data from your defibrillator or other data
sources vary by defibrillator model. For more information, see:
• Deleting cases from HeartStart FRx or HeartStart HS1 defibrillators
on page.76.
• Transferring FR3 data to Data Messenger using Bluetooth wireless
technology on page.68
• Transferring FR3 data to Data Messenger using data cards on
page.70.
5 - Processing cases manually Data Messenger user guide

6
Processing cases
automatically
When you first install Data Messenger, it runs in Automatic mode using
the default workflow settings.
The settings you configure on the Data Messenger Configuration window
determine how Data Messenger will process cases. Processing can
consist of editing, printing, forwarding, and saving cases.
This section introduces the Automatic mode and describes how Data
Messenger manages cases without your intervention.
Using the Automatic mode
Data Messenger is configured by default to run in Automatic mode the
first time you install. You can set the Automatic mode or Manual Process
mode on the General tab of the Data Messenger Configuration screen.
In automatic mode, Data Messenger does the following:
• Notifies you when it receives and processes patient data, and when
it encounters an error.
• Generates and prints the Full Disclosure case report.
• Erases case data from the defibrillator or its data source (either a
data card or the Bluetooth folder).
• Stores a log file for a default period of 7 days.
• Stores backup data in a default location indefinitely, until you delete
it.
You can customize your workflow settings at any time. For more
information, see Configuring HeartStart Data Messenger on page.28.
56
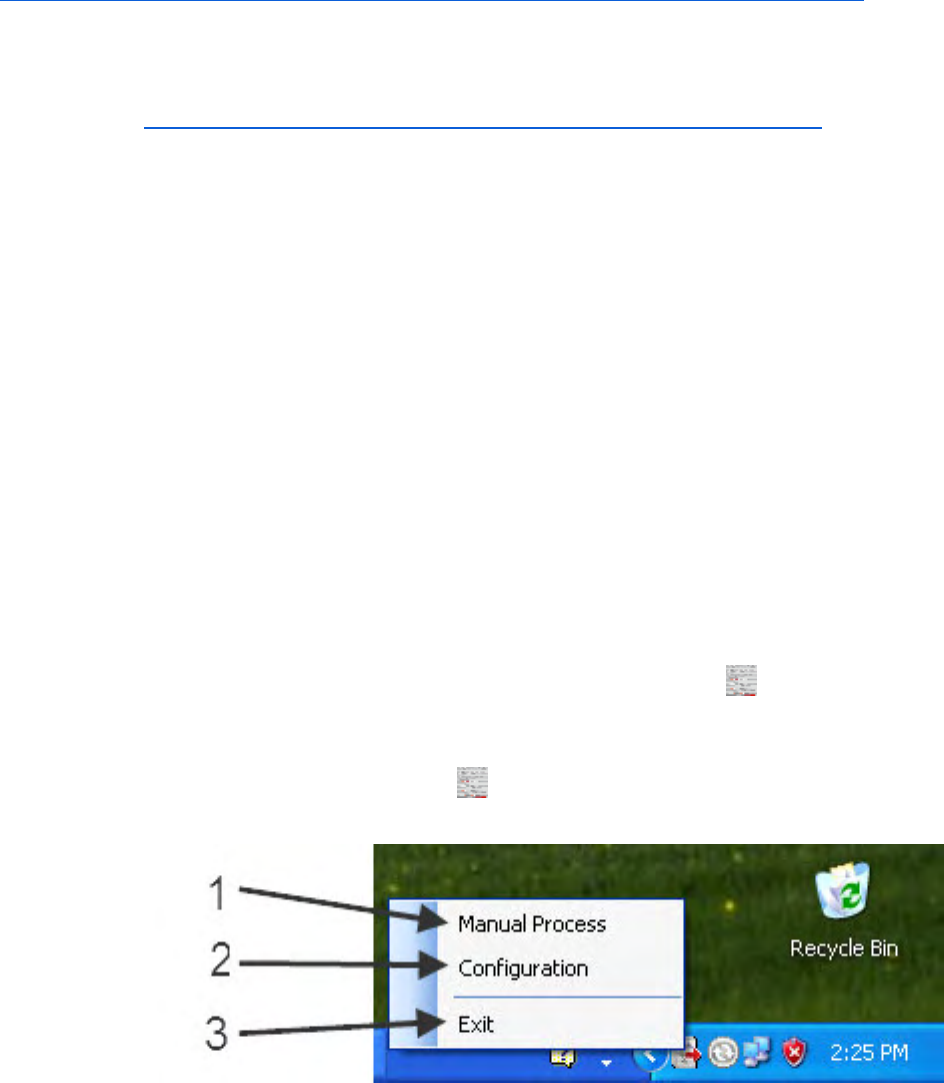
57
If Data Messenger is running in Manual Process mode, you can configure
it to run in Automatic mode to process cases. For more information, see
Configuring Data Messenger to process cases in the Automatic mode on
page.33.
To start running the Automatic mode
Log on to the computer.
Data Messenger starts running in the background, managing cases
according to the selected workflow. The Data Messenger icon appears in
the notification area, in the lower right corner of your monitor. This icon
appears only when you are in the Automatic mode.
To exit Data Messenger when running in the Automatic mode
In the notification area, right-click the Data Messenger icon to open the
menu, and click Exit.
Using the Data Messenger icon in the
notification area
When you are in the Automatic mode, the Data Messenger icon
appears in the notification area of the Windows taskbar, at the bottom
right of your monitor.
Right-click the Data Messenger icon to open a menu with the
selections Manual Process (1), Configuration (2), and Exit (3).
Data Messenger processes cases automatically until you exit Data
Messenger, log off the computer, change the logon for the computer,
open the Manual Process mode, or turn off the computer.
6 - Processing cases automatically Data Messenger user guide

58
When Data Messenger is configured to display feedback messages, they
appear in the notification area. See Controlling feedback messages on
page.36.
While your system is in the Automatic mode, you can switch
temporarily to Manual Process mode by opening the Manual Process
window. For more information, see Using the Data Messenger
Manual Process window on page.47. When you close the Manual
Process window, the system resumes operating in the Automatic
mode.
To open the Data Messenger Manual Process window while
operating in the Automatic mode
Do one of the following:
• On the Windows Start menu, click Data Messenger Manual
Process.
• In the notification area, right-click the Data Messenger icon and
click Manual Process.
To open the Data Messenger Configuration window while
operating in the Automatic mode
Do one of the following:
• On the Windows Start menu, click Data Messenger
Configuration.
• In the notification area, right-click the Data Messenger icon and
click Configuration.
When you open the Data Messenger Configuration window with Data
Messenger in the Automatic mode, processing of incoming data is
interrupted until you close the Configuration window. If Data
Messenger is processing a case when you open the Configuration
window, it might not complete the workflow.
To close the Data Messenger Configuration window while
operating in the Automatic mode
In the Data Messenger Configuration window, click the Close button.
6 - Processing cases automatically Data Messenger user guide

59
Data Messenger closes the window and resumes processing of the
patient data automatically. The Data Messenger icon appears in the
notification area.
Using the Notifications window
When Data Messenger is running in Automatic mode, you can choose to
apply preconfigured actions to received data. Choose these actions on
the General tab at the top of the Data Messenger Configuration window.
Actions for the received data include:
• Notification of data received
• Notification of data processed
• Notification of error encountered
When any of the above data events occur, the Notification window
appears at the bottom right of your screen. The window lists the most
recent 1,000 messages and fades out after seven seconds if Data
Messenger does not receive any new messages.
To use the Notification window
Do any of the following:
• Click once in the window to prevent the window from fading out after
seven seconds.
• Click on the scroll bar and move it up and down to view messages.
• Double-click any message to start Manual Process mode and display
the System Log tab in the Data Messenger Manual Process window.
6 - Processing cases automatically Data Messenger user guide

7
Working with the
System Log
You can view the System Log to see a list of all the Data Messenger
activity. Use the System Log to monitor system activity and to
troubleshoot the processing of patient data.
When working with the System Log, you can customize the way
information displays in the list of entries. You can change how columns
display, and sort and group the list of entries.
This section provides an overview of how to use the System Log in Data
Messenger.
Data Messenger automatically clears System Log messages after a
certain number of days, based on the setting you chose on the
General tab on the Data Messenger Configuration window. For more
information, see Storing System Log messages and backup files on
page.35.
Activities logged by Data Messenger
The System Log lists Data Messenger activity and displays it on the Data
Messenger Manuel Process window.
For each action, Data Messenger logs the following information:
• Type of message—for example, Information or Error
• Action that occurred—for example, a feature stopped operating
• Description of the action
• Date and time when the action occurred
If the text for the description of the action does not fully display in the
column, hover the mouse over the description text. Data Messenger
displays the text in a pop-up window. You can also change the width of
the column.
60

61
To help you monitor specific information, you can change how the
information appears on the System Log. For example, you can move
columns with important information to the beginning of the table, and
then group the information columns based on that column.
When you change the default layout of the System Log, Data Messenger
displays the new layout the next time you use the System Log.
Displaying the System Log
To display the System Log
1. On the Start menu, click Philips HeartStart Data Messenger
4.3, and then click Data Messenger Manual Process.
The Data Messenger Manual Process window appears.
2. Click the System Log tab.
For more information about monitoring system activities, see
Monitoring system activities on page.23.
Working with columns
You can customize the columns that appear on the table.
To change a column width
Use the mouse to click and hold the column border, and then drag the
border to the size you prefer.
To restore a column to its default width
Use the mouse to click the left border of a column, and then double-click
the mouse.
To hide or display the columns on the table
1. Right-click anywhere within the grid to display a shortcut menu.
2. Check the box for each column that you want to hide or display on
the table.
Column headers with a checkmark appear on the table.
7 - Working with the System Log Data Messenger user guide

62
To change the order in which columns appear
Use the mouse to click and hold the column header, and then drag the
column to the left or right to a new location.
Sorting entries in a column
You can sort the rows of information in a column. Data Messenger
displays a triangular symbol (arrow) in the column header to indicate
the sort order.
Click the column header to sort the list of values in ascending (1 to 9, or
a to z) or descending (9 to 1, or z to a) order.
Grouping entries
You can organize the rows into primary and secondary sorts. For
example, you can select a primary sort based on the action and a
secondary sort based on the description of the action.
Use the area above the entries to set up groups of entries. For example,
drag the Action column header to the area above the columns, and then
drag the Description column header below the Action header in the same
area. Data Messenger gathers all the entries with the same action in one
group.
To group entries
1. Click a column header and drag it to the grouping area with the
notation Drag a Column Header Here to Group by that Column.
The column name moves to the grouping area, forming the primary
sort.
2. Repeat step 1 with other columns as necessary.
Data Messenger creates the next group level, forming the secondary
sorts.
To display entries in a group
Click Expand to the left of the group that you want to expand. An
expanded group lists all the entries assigned to that group.
7 - Working with the System Log Data Messenger user guide

63
To hide entries in a group
Click Collapse to the left of the group that you want to collapse. A
collapsed group displays the group title.
To undo grouping for a single column
Click a column header in the grouping area and drag it below the table
header.
To undo grouping for all columns
1. Click a column header in the grouping area and drag it to the table
header.
2. Repeat step 1 for each column.
Clearing System Log entries
Data Messenger retains the System Log entries for the number of days
that is set on the General tab on the Data Messenger Configuration
window. For more information, see Storing System Log messages and
backup files on page.35
Troubleshooting system activities
You can also use the System Log to help troubleshoot the system
activities. For a description of the system messages, see System Log
messages on page.89.
If you need additional customer support, call or email customer support.
For more information, see Customer support on page.110.
To email the System Log
1. Open either the Data Messenger Configuration window or the Data
Messenger Manual Process window.
2. On the toolbar, click Help.
7 - Working with the System Log Data Messenger user guide

64
3. Click Email Customer Support.
Data Messenger creates an email, addresses it to customer support,
and attaches the System Log information. You can add additional
information in the body of the email message.
4. Click Send.
7 - Working with the System Log Data Messenger user guide

8
Working with
defibrillators
This section discusses how to download case data from the supported
defibrillators.
HeartStart Data Messenger can download defibrillator case data through
infrared, Bluetooth, Ethernet, or data-card access. Depending on the
defibrillator, you might also need an infrared adapter, a card reader, a
card adapter, or a Bluetooth adapter to read and download case data to
Data Messenger.
Supported defibrillators
Use the information in this topic to download product and user service
manuals from the Philips Web site, and to identify the method that a
defibrillator uses to read data.
To download product user and service materials
• Click the following link and navigate to your AED or monitor
defibrillator:
http://www.healthcare.philips.com/main/support/ProductDocument
ation/
• For HeartStart FR3, FRx, FR2, and HS1 defibrillators, you can also
click the following link:
http://www.healthcare.philips.com/main/products/resuscitation/pro
ducts/aeds/online_resources.wpd
The method used to read and transfer defibrillator data varies by
defibrillator model. Find your defibrillator in the following table.
Philips defibrillator
model Method used to read data
HeartStart FR3
defibrillator
Data-card access:
Custom Philips SD data card with an SD data-card
reader. Bluetooth connection.
65

66
Philips defibrillator
model Method used to read data
See Transferring HeartStart FR3 data on page.66.
HeartStart FR2
defibrillator
Data-card access:
CompactFlash data card with CompactFlash data-card
reader.
See Reading HeartStart FR2 data on page.71.
HeartStart FRx
defibrillator
Infrared connection.
See Downloading HeartStart FRx and HeartStart HS1
data on page.72.
HeartStart HS1 family
of defibrillators:
HeartStart Home and
HeartStartOnSite
defibrillators
Infrared connection.
See Downloading HeartStart FRx and HeartStart HS1
data on page.72.
HeartStart MRx
defibrillator
Data-card access:
CompactFlash data card with CompactFlash data-card
reader.
Bluetooth connection:
Defibrillators with version 9.0 or later with the Event
Summary Bluetooth Transfer feature enabled.
Defibrillators with version F.02 or later.
Ethernet connection for defibrillators with version F.01
or later.
See Working with HeartStart MRx data on page.76 and
Prerequisites for using Bluetooth for HeartStart MRx
on page.79.
HeartStart XL and
XL+ defibrillators
Data-card access:
ATAflash cards with the ATAflash-card reader.
USB port (XL+ only)
See Reading XL data on page.83.
Transferring HeartStart FR3 data
You can transfer HeartStart FR3 data wirelessly to your computer if the
computer running Data Messenger is Bluetooth enabled and the FR3
defibrillator is Bluetooth enabled.
8 - Working with defibrillators Data Messenger user guide

67
To determine if FR3 is Bluetooth enabled
On the FR3 defibrillator, select Administration mode, and then select
Wireless Data Transfer. If Wireless Data Transfer does not appear in the
menu, then it is not available. In that case, use a Philips secure digital
(SD) card to transfer data.
Operating multiple instances of Data Messenger with Bluetooth
wireless technology for communication with your FR3 defibrillators
with Bluetooth wireless technology in close proximity may
potentially result in unintended pairing, case downloading, labeling,
and destination routing. Data could fail to arrive at the intended
destination. Use Data Messenger with Bluetooth wireless
technology only when out of range of other Philips data
management software running Bluetooth wireless technology.
If you have HeartStart FR3 defibrillators equipped with Bluetooth
wireless technology, and multiple instances of Data Messenger in
close range running automatically, Philips recommends that you
configure all instances of Data Messenger in the vicinity the same
way, using with the same reference ID and institution. This way, no
matter which instance is discovered, the FR3 and its patient data
will be processed, labeled, and routed in the same way.
Preparing the FR3 to transfer data
Prepare the FR3 defibrillator to transfer case data by placing it in
Administration mode.
To place the FR3 defibrillator to Administration mode
1. If the pads connector is present, unplug it.
2. Insert the FR3 battery into the defibrillator. For further instructions
on installing the battery, see the HeartStart FR3 Defibrillator
instructions for administrators. When the battery is inserted, the
defibrillator sounds a beep, and the power light at the top is solid
green.
3. Wait until the power light begins periodically flashing green.
4. Quickly press the green power button. The screen illuminates with
an image of a patient. The voice prompt announces, "Plug in pads
connectors."
8 - Working with defibrillators Data Messenger user guide

68
5. Disregard the voice prompts in this instance. Do not plug in the pads
connectors. The voice prompts stop once you place the defibrillator
in Administration mode.
6. Press the green power button again. The message "Shutting Down,"
appears with a progress bar, and "Administration" appears on the
lower left corner of the screen, above the three soft keys.
Selecting Administration mode interrupts the shutdown process.
You have several seconds to select Administration mode before
shutdown occurs.
7. To select Administration mode, press and release the left soft key
under Administration on the screen. This action interrupts the
shutdown process. The FR3 defibrillator enters Administration mode,
and Administration now appears at the top of the screen.
If you do not press a soft key while the FR3 defibrillator is in the
Administration mode, or if no action occurs for ten minutes after
performing a transfer using Bluetooth wireless technology,
Administration mode times out. When Administration mode times
out, the FR3 defibrillator enters Standby mode. A flashing green
light above the green power button identifies the Standby mode.
To exit Standby mode
To exit Standby mode and return to Administration mode, resume the
previous procedure at Step 3.
To exit Administration mode
To exit Administration mode, press the green power button. Wait 10
seconds for the FR3 defibrillator to shut down.
Transferring FR3 data to Data Messenger using
Bluetooth wireless technology
If your computer and the FR3 defibrillator are Bluetooth enabled,
prepare to transfer case data by placing the FR3 defibrillator in
Administration mode.
8 - Working with defibrillators Data Messenger user guide

69
The process of transferring case data from the FR3 defibrillator to Data
Messenger is the same whether you are running Data Messenger in
Automatic mode or Manual Process mode. However, handling of the
case data after transfer varies, depending on your configuration of Data
Messenger.
To transfer FR3 data to Data Messenger using Bluetooth
wireless technology
1. Ensure that the computer with Data Messenger is on and that the
Data Messenger application is running.
2. Place the FR3 defibrillator and the computer with Data Messenger
within Bluetooth transmission range, usually within 30 feet (9
meters) of each other.
3. Put the FR3 defibrillator into Administration mode. For more
information, see Preparing the FR3 to transfer data on page.67.
4. With the FR3 in Administration mode, press the left option button to
scroll through the menu options until Wireless Data Transfer appears
highlighted on the defibrillator screen. Press the middle option
button to select Wireless Data Transfer.
The defibrillator screen displays the message "Ready for Data
Transfer," indicating that the FR3 defibrillator is sending a Bluetooth
signal. When Data Messenger with Bluetooth wireless technology
detects the FR3 Bluetooth signal, case data transfer begins. All cases
are transferred from the FR3 defibrillator to Data Messenger.
5. If you have selected Erase Source Data on the Case Workflow tab,
then as soon as all cases have been transferred from the FR3
defibrillator, Data Messenger deletes all cases from the defibrillator
and synchronizes the time on the defibrillator clock with the time on
the computer clock. This is true for both Manual Process and
Automatic mode.
To exit Wireless Data Transfer mode
When you are finished transferring data from the FR3 defibrillator, turn
off Wireless Data Transfer mode by pressing the middle option button.
The FR3 defibrillator screen returns to Administration mode.
The point in your workflow where all cases are deleted from the
FR3 defibrillator may differ if you are using a customized
configuration of Data Messenger.
8 - Working with defibrillators Data Messenger user guide
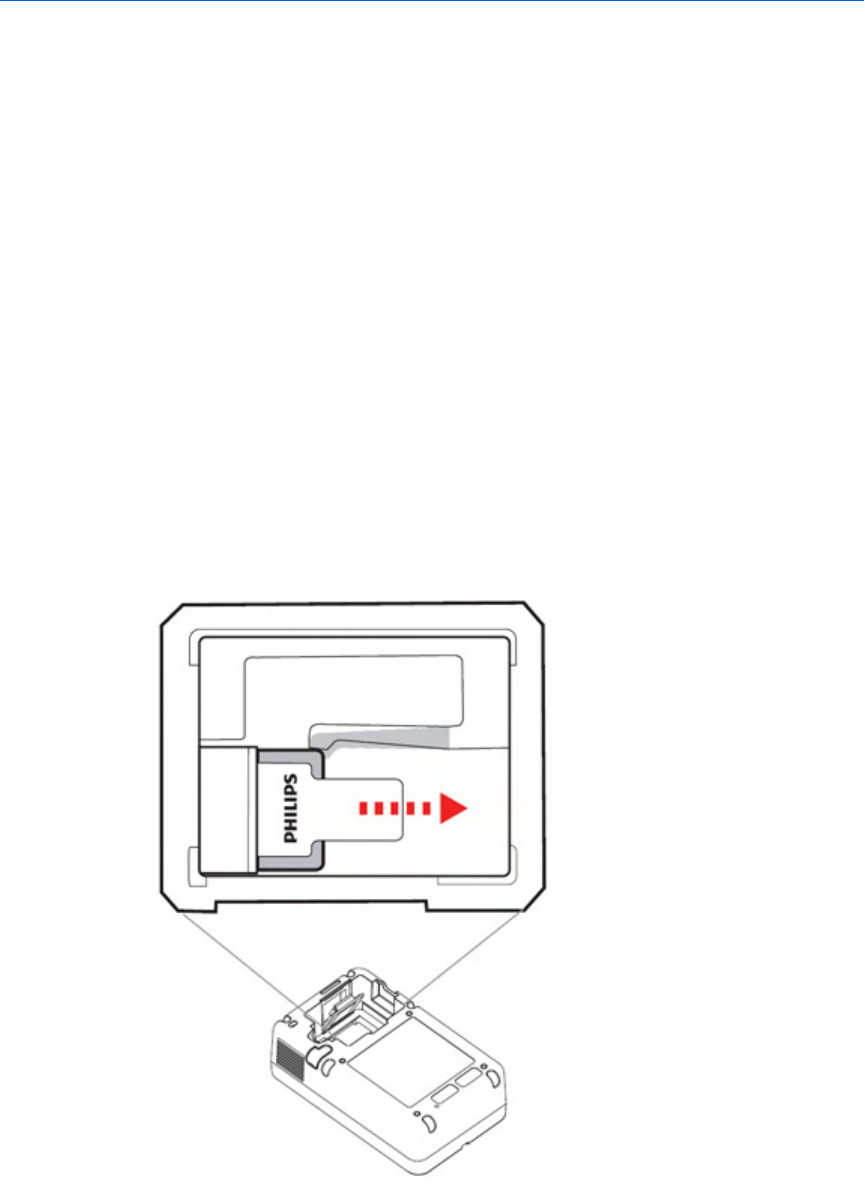
70
Transferring FR3 data to Data Messenger using
data cards
You can download detailed incident data directly from the Philips secure
digital (SD) data card in the FR3 defibrillator to a computer with Data
Messenger software. The computer can read a Philips SD data card with
an internal or external SD card reader.
This process is the same whether you are running Data Messenger in the
Automatic mode or the Manual Process mode.
To remove the data card from the FR3 defibrillator
1. Remove the battery from the FR3 defibrillator to expose the data
card. For further instructions on removing the battery, see the
HeartStart FR3 defibrillator instructions for administrators.
2. Pull the data card by its tab to remove it from the FR3 defibrillator,
as illustrated below.
8 - Working with defibrillators Data Messenger user guide

71
To transfer FR3 data from the data card to Data Messenger
1. Ensure that the computer with Data Messenger is on and that the
Data Messenger application is running.
2. On the computer with Data Messenger software, place the FR3 data
card into the card reader. When inserting the data card, orient the
card with the label facing up, and the tab toward you. Windows
detects the data card and begins transferring data. All data is
transferred from the FR3 defibrillator to Data Messenger.
3. If you chose the default workflow settings in Data Messenger
Automatic mode, then as soon as all cases have been transferred
from the FR3 defibrillator, Data Messenger deletes all cases from
the defibrillator and synchronizes the time on the defibrillator clock
with the time on the computer clock.
Before removing the data card from the adapter or card reader,
ensure that data transfer is complete. Premature removal of a data
card can cause a data error.
Reading HeartStart FR2 data
The HeartStart FR2 series defibrillator stores patient event-summary
data on a CompactFlash card.
CompactFlash card readers are available through your Philips sales
representative or local distributor.
Before removing the data card from the card reader, ensure that
data transfer is completed. Premature removal of a data card can
cause a data error.
To read a data card
1. Remove the data card from the HeartStart FR2 series defibrillator.
2. One end of the data card has a series of perforations. Insert the card
by this end firmly into the card reader.
3. Check in Windows Explorer to see that the card was recognized.
When Windows recognizes the card, it assigns a drive letter to the
card.
8 - Working with defibrillators Data Messenger user guide
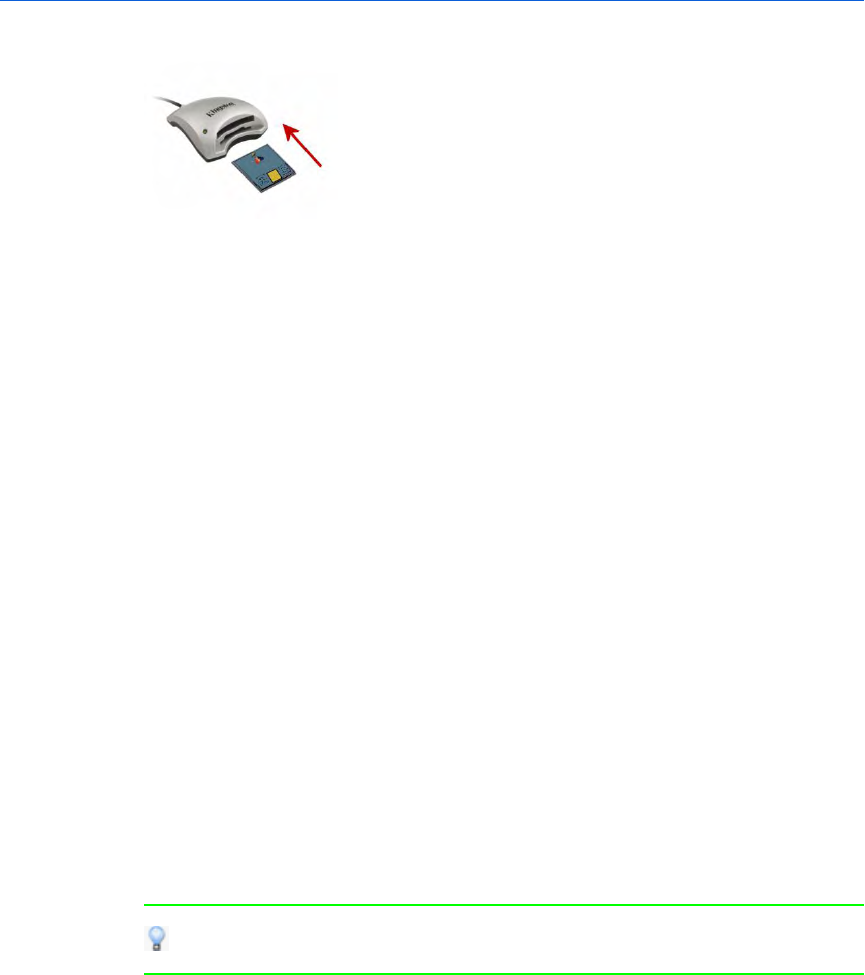
72
A HeartStart FR2 c ard being inserted into a Kingston card reader
Downloading HeartStart FRx and
HeartStart HS1 data
The HeartStart FRx and HeartStart HS1 defibrillators use an infrared
(IrDA) communications port to transfer information.
The infrared port is located on the lower right side of the defibrillator.
To transfer information, the receiving computer must be set up for
infrared communication. Some computers might have infrared ports. If
the computer does not have an infrared port or the port does not work
with the defibrillator, you can add an infrared adapter.
An infrared adapter that connects to a USB port is the recommended
adapter.
Setting up an infrared adapter
You can use most infrared adapters to transfer data between a computer
running Data Messenger and a defibrillator that uses the infrared
transfer method.
For best results, plug the hardware adapter into the USB port and
use the device driver supplied with the adapter.
Data Messenger recognizes when an infrared adapter is plugged into the
computer and is available. A Windows notification indicates that data
can be transferred by infrared connection. You do not have to perform
any additional steps. If you have to run the driver setup program, then
install the CD-ROM that came with your infrared adapter and use your
computer's New Hardware Wizard to guide you through setting up the
adapter.
An infrared adapter is available from Philips.
8 - Working with defibrillators Data Messenger user guide

73
To set up the infrared adapter
1. Read the setup instructions for the driver that is used by the infrared
adapter.
2. Run the driver setup program on the Windows operating system.
3. Follow instructions as the New Hardware Wizard guides you through
set up of the adapter.
Downloading HeartStart FRx data
Downloading patient event-summary data from the HeartStart FRx
defibrillator requires an infrared connection between HeartStart Data
Messenger and the defibrillator.
To transfer information, you must put the defibrillator into the
Administration mode.
If the HeartStart FRx does not receive a transmission within 3 minutes
of starting the Administration mode, it cancels the Administration mode
and you must start over.
The Administration mode is active for 30 minutes after the last
transfer is made.
To download HeartStart FRx patient data
1. Start Data Messenger.
2. Return to the defibrillator and remove the pads connector. The
defibrillator voice message might tell you to plug in the pads
connector so that it is ready for patient use. However, do not plug in
the pads connector at this time.
3. Set up the defibrillator to communicate with the computer. Make
sure that the defibrillator infrared port and the computer infrared
port face each other, are within 6 to 18 inches (16 to 45 cm) of each
other, and have a clear and level path between them.
4. Turn on the defibrillator power.
5. On the defibrillator, press and hold the blue i-button until you hear
three tones. (The defibrillator sounds a tone once in about two
seconds after pressing the blue i-button. In about two more seconds,
it sounds a tone two more times.)
8 - Working with defibrillators Data Messenger user guide

74
6. Release the blue i-button. The defibrillator voice message announces
"Administration."
7. Return to the Data Messenger computer and align the defibrillator’s
infrared port with the infrared port on the computer. You can now
send and receive information between the defibrillator and the
computer. HeartStart FRx announces "Transferring data." Be sure to
wait until the transmission is complete before you move the
defibrillator from the computer infrared port.
8. When sending and receiving information is complete, remember to
exit the Administration mode:
a. Place the defibrillator in Standby Mode by pressing the on-off
button.
b. Insert the pads connector. This ensures that the defibrillator is
ready for use on the next patient. For more information, refer to
the HeartStart FRx defibrillator owner’s manual.
Downloading HeartStart HS1 data
Downloading patient event-summary data from the HeartStart HS1
defibrillator requires an infrared connection between Data Messenger
and the defibrillator.
If the HeartStart HS1 does not receive a transmission within 30 seconds
of starting the Administration mode, you must place the defibrillator
back in Administration mode.
The Administration mode is active for 30 minutes after the last
transfer is made.
To download HeartStart HS1 defibrillator patient data
1. Start Data Messenger.
2. Return to the defibrillator and make sure that there is a battery in
the defibrillator.
3. Locate the latch at the top edge of the HeartStart HS1 and slide it to
the side. The HeartStart HS1 releases the pads cartridge.
4. Remove the pads cartridge. The defibrillator voice message might
tell you to insert the pads cartridge so this is ready for patient use.
However, do not insert the pads cartridge at this time.
8 - Working with defibrillators Data Messenger user guide

75
5. Set up the defibrillator to communicate with the computer. Make
sure that the defibrillator infrared port and the computer infrared
port face each other, are within 6 to 18 inches (16 to 45 cm) of each
other, and have a clear and level path between them.
6. Turn on the defibrillator power.
7. On the defibrillator, press and hold the blue i-button until you hear
three tones. (The defibrillator sounds a tone once in about two
seconds after pressing the button. In about two more seconds, it
sounds a tone two more times.)
8. Release the button after the third tone. The defibrillator voice
message announces "Administration."
9. Press the blue i-button again for less than one second. The
defibrillator voice message announces "Mode 1".
10. Return to the Data Messenger computer and align the defibrillator’s
infrared port with the infrared port on the computer. You can now
send and receive information between the defibrillator and the
computer. HeartStart HS1 announces that it is sending. Be sure to
wait until the transmission is complete before you move the
defibrillator from the computer infrared port.
11. When sending and receiving information is complete, remember to
exit the Administration mode.
a. Place the defibrillator in Standby Mode by pressing the on-off
button.
b. Insert the pads cartridge.
This ensures that the defibrillator is ready for use on the next
patient.
For more information, refer to the instructions for use provided with the
defibrillator.
Determining the case date and time
The HeartStart FRx and HeartStart HS1 family of defibrillators do not
have a real-time clock that maintains the defibrillator date and time.
Instead, the defibrillator has a continuously running timer that starts
when you insert the battery. When responders use the defibrillator, all
events and data are stamped with this running timer. When you remove
the battery, the timer resets and the defibrillator keeps the last-use ECG
recordings for 30 days before it automatically erases the data to
prepare for a future use.
8 - Working with defibrillators Data Messenger user guide

76
Each time that Data Messenger communicates with a HeartStart FRx or
HeartStart HS1 defibrillator, Data Messenger uses the date and time of
the computer clock, and the date and time stamp of the defibrillator, to
calculate the date and time of all events and data since the battery was
last inserted.
To ensure that you can download the defibrillator information for
the last clinical use, download the last-use ECG recordings to a
computer that runs software such as Data Messenger. Download the
information within 30 days of the recording and before you remove
the battery.
Deleting cases from HeartStart FRx or
HeartStart HS1 defibrillators
Follow this process to delete patient data from your HeartStart FRx or
HS1 defibrillators.
1. Put the defibrillator in the Administration mode.
2. Set up infrared communication between your defibrillator and the
computer.
3. Make sure that the defibrillator infrared port and the computer
infrared port face each other, are 6 to 18 inches (16 to 45 cm) from
each other, and have a clear and level path between them.
4. On the Cases tab, click the case that you want to delete from the
defibrillator. For more information, see Selecting cases on page.50.
5. On the toolbar, click the Delete button. A message appears asking
you to verify the deletion.
6. To delete the selected cases immediately, click OK. Data Messenger
displays the action on the Systems Log tab.
Working with HeartStart MRx data
When using configurations involving Telemedicine, be sure to verify
the URL for Telemedicine before working with actual cases.
Incorrect connection information may result in delay of data
transfer. See Specifying advanced workflow for the HeartStart MRx
on page.43.
8 - Working with defibrillators Data Messenger user guide

77
The HeartStart MRx defibrillator stores information in internal
memory. To open the information in the Philips Data Management
Solutions software, such as Data Messenger, you need to transfer
the information from the internal memory to an external
CompactFlash card.
Follow the instructions in the HeartStart MRx monitor/defibrillator
instructions for use guide.
After you transfer the information to a CompactFlash card, you can read
the card using an internal or external CompactFlash card reader.
CompactFlash card readers are available through your Philips sales
representative or local distributor. For more information, see the
HeartStart MRx monitor/defibrillator instructions for use guide.
Before removing the data card from the card reader, ensure that
data transfer is completed. Premature removal of a data card can
cause a data error.
To read a data card with a card reader
1. Remove the data card from the HeartStart MRx data-card tray.
2. One end of the data card has a series of perforations. This end goes
into the adapter.
3. One end of the adapter has a similar series of perforations. Insert
this end of the adapter firmly into the PC Card reader.
Typically, the computer sounds an audio signal to indicate that the
reader is active.
4. Check in Windows Explorer to see that the card is recognized. When
Windows recognizes the card, it assigns a drive letter to the card.
5. If the card does not appear in Windows Explorer, remove the card
from the card reader, and then insert it into the card reader again.
A HeartStart MRx card being inserted into an adapter
8 - Working with defibrillators Data Messenger user guide

78
A HeartStart MRx card being inserted into a Kingston card reader
Downloading HeartStart MRx data
using Bluetooth
You can transmit HeartStart MRx data to Data Messenger through a
Bluetooth wireless transmission.
The HeartStart MRx data can include event-summary, 12-lead reports,
and periodic clinical data. Periodic clinical data can include 12-lead
reports, trigger events and waveforms, and periodic vital trends.
HeartStart MRx data might contain information that could be considered
Patient Healthcare Information (PHI) or patient-identifiable data. This
information can be transferred from HeartStart MRx. Be sure to handle
the information in accordance with HIPAA or your local patient privacy
requirements.
Understanding Bluetooth for HeartStart MRx
To transfer the information from the HeartStart MRx defibrillator to Data
Messenger, you must set up the Bluetooth transmission on the
defibrillator and on the computer that has Data Messenger installed.
If the computer is not equipped with Bluetooth, it requires a Bluetooth
adapter to receive data from the defibrillator. The adapter connects the
computer that has Data Messenger installed and the defibrillator.
Each Bluetooth device from a different manufacturer has a unique set of
features and configuration options. To ensure reliable transmissions,
familiarize yourself with the Bluetooth configuration choices of each.
Some configuration choices (either default or chosen by the user)
could prevent receipt of data from the defibrillator. For example, it
is recommended that you disable features such as “Start discovery
every 10 minutes.” Enabling this option could interfere with
transmissions from HeartStart MRx.
8 - Working with defibrillators Data Messenger user guide

79
When you install the Bluetooth software on the receiving computer, the
process creates the Bluetooth configuration folder. This folder is based
on the logon of the user who configured the Bluetooth wireless
technology. For example, the folder for user1 is typically at the
following location:
C:\Document and Settings\user1\My Documents\Bluetooth Exchange
Folder
When the defibrillator transmits data to Data Messenger, the
defibrillator creates subfolders on the computer to store the transmitted
data.
Prerequisites for using Bluetooth for HeartStart
MRx
The Bluetooth card on HeartStart MRx is inside of the defibrillator. Make
sure that you purchased HeartStart MRx with the appropriate Bluetooth
option or upgrade.
Confirm that you have a Bluetooth card installed and one or more of the
Bluetooth options enabled—for example, the event-summary Bluetooth
transmission feature.
See Selecting Bluetooth accessories on page.88.
For detailed information on setting up the HeartStart MRx defibrillator
for Bluetooth transmission, refer to the most current release of the
following documentation:
• HeartStart MRx instructions for use
• HeartStart MRx instructions for use addendum
Setting up Bluetooth for HeartStart MRx
The Data Messenger computer must support the FTP Server profile to
receive files from the HeartStart MRx.
Setting up the Bluetooth software and adapter involves the following
tasks:
• Installing the Bluetooth software and adapter
• Pairing the defibrillator Bluetooth option with the computer
• Testing the connection
8 - Working with defibrillators Data Messenger user guide

80
While setting up the Bluetooth software and adapter, make sure that the
defibrillator and the computer with the software installed are within
Bluetooth transmission range, usually within 30 feet (9 meters) of each
other. For more information, see the HeartStart MRx instructions for
use.
To install the Bluetooth software and adapter
1. Read the instructions that came with the Bluetooth adapter.
2. Install the Bluetooth software and connect the adapter according to
the instructions.
The Bluetooth configuration typically creates the folder based on
the logon of the user who configured it. For example, if you have
the administrator logon, the default folder location is typically:
C:\Document and Settings\Administrator\My Documents\Bluetooth
Exchange Folder. If the user who receives the wireless
transmission is not the administrator, you can change the path to
point to that user’s Bluetooth exchange folder.
To specify the location of the Bluetooth Exchange Folder
Refer to your Bluetooth software and adapter documentation.
To pair the defibrillator Bluetooth option with the computer
Refer to your Bluetooth software and adapter documentation.
Pairing and testing the HeartStart MRx
Bluetooth option
Before you use Bluetooth transmission with the MRx, you must pair and
test them.
Make sure that the computer is turned on and that the Bluetooth
software and adapter are installed and visible or discoverable.
To pair the HeartStart MRx Bluetooth option with the computer
1. On HeartStart MRx, place the defibrillator in the Data Management
mode.
8 - Working with defibrillators Data Messenger user guide

81
2. On the HeartStart MRx Main menu, scroll to Other and press the
Enter button.
3. On the Other menu, scroll to Bluetooth Devices and press the Enter
button.
4. On the Bluetooth Devices menu, select Add Device and press the
Enter button.
The defibrillator searches for your computer.
If your computer is not listed after the search, your computer
Bluetooth is not enabled or set up correctly. Refer to your Bluetooth
documentation to troubleshoot the setup.
5. Select your computer and press the Enter button.
6. Enter a passkey for the Bluetooth option.
The passkey is a user-defined character sequence, such as 000, or
1234.
7. Scroll to Done and press the Enter button.
8. On the computer, locate the notification area of the taskbar.
Immediately watch for a pop-up message.
9. Click the pop-up message.
10. Enter the same Bluetooth passkey that you entered in Step 6.
11. On the Bluetooth Service menu, scroll to File Transfer and then press
the Enter button. The message “Transmission Test Passed” appears.
12. On the Add Device menu, scroll to Exit and press the Enter button.
Sending HeartStart MRx Bluetooth
transmissions
You can download a case from HeartStart MRx to the computer through
a Bluetooth transmission.
Make sure that the application computer is turned on and that the
Bluetooth software and adapter are installed.
To make a Bluetooth transmission
1. On the HeartStart MRx, place the defibrillator in the Data
Management mode. If necessary, use the HeartStart MRx documents
listed for Prerequisites for using Bluetooth for HeartStart MRx on
page.79.
8 - Working with defibrillators Data Messenger user guide

82
2. Press Next Item or Prev Item to navigate to the incident of your
choice.
3. Scroll to Send.
4. Press Send.
5. Select the type of information that you want to transmit to Data
Messenger and press Enter.
6. The first time you send a Bluetooth transmission, complete steps 7
and 8.
In the notification area of the task bar, immediately watch for a pop-
up message.
7. Click the pop-up message.
8. Check the Always Allow Authorization box.
After HeartStart MRx transmits the incident to the computer, you can
attach the ECG from HeartStart MRx in Data Messenger.
Downloading HeartStart MRx data
using batch LAN data transfer
The batch LAN data-transfer option is available on HeartStart MRx
defibrillators with software version F.01 or later. This feature automates
and streamlines data management workflows, which helps you optimize
patient care information for timely retrospective reviews. This is most
commonly used at the end of a work shift when a medic wants to
download all cases from HeartStart MRx for quality review.
To do this, connect HeartStart MRx to a LAN cable on the network when
HeartStart Data Messenger runs on a local PC or the network.
HeartStart MRx downloads the event summaries from the defibrillator,
and it updates the internal clock with the local computer date and time.
It is also possible to use the batch LAN data-transfer option with
HeartStart Data Messenger in the back of an ambulance, to transfer one
or more cases.
Understanding the batch LAN data-transfer
process
The following describes the process of transferring event summaries
from the HeartStart MRx defibrillator to Data Messenger.
8 - Working with defibrillators Data Messenger user guide

83
1. Connect HeartStart MRx to the Ethernet cable. HeartStart MRx
queries the network for an IP address. The DHCP server
acknowledges the request and assigns an IP address for HeartStart
MRx.
2. HeartStart MRx searches for the computer that runs Data Messenger
on the local subnet. HeartStart MRx detects Data Messenger.
3. HeartStart MRx sends the notification to Data Messenger. Data
Messenger passes the FTP access information to HeartStart MRx.
4. HeartStart MRx sends event-summary data to the FTP server based
on the access information. Data Messenger monitors the FTP server
inbox and processes the received event summaries as a case,
according to the configuration.
For more information, see the HeartStart MRx monitor/defibrillator
instructions for use and the Data Management solutions implementation
guide.
Prerequisites for using batch LAN data transfer
The following are prerequisites for the HeartStart MRx defibrillators with
software version F.01 or later that have the batch LAN data-transfer
option enabled:
• LAN Ethernet cable
• Network router that is connected to an IP address server (DHCP
server)
• Computer with the following installed:
• Data Messenger software
• Windows FTP Server or third-party FTP Server
• Data Messenger operating
For each prerequisite, follow the instructions in the HeartStart MRx
monitor/defibrillator instructions for use. Consult your IT department
for help with this implementation.
Reading XL data
The HeartStart XLdefibrillators store information on an ATAflash card.
Read the documentation for the defibrillator to learn how to remove the
card from the defibrillator.
8 - Working with defibrillators Data Messenger user guide

84
You can read the ATAflash cards in an ATAflash-card reader or a
PCcard reader. If the computer is not equipped with an adapter, you
can add one as an internal or external card reader. The external card
reader plugs into the computer's USBport.
CompactFlash card readers are available through your Philips sales
representative or local distributor.
Before removing the data card from the adapter or card reader,
ensure that data transfer is complete. Premature removal of a data
card can cause a data error.
To read a data card
1. Remove the data card from the defibrillator.
2. One end of the card has a series of perforations. This end goes into
the card reader. Insert the card firmly into the card reader.
3. Check in Windows Explorer to see that the card was recognized.
When Windows recognizes the card, it assigns a drive letter to it.
4. If the card does not appear in Windows Explorer, remove it from the
card reader and insert it into the card reader again.
Transferring XL+ data
The HeartStart XL+ defibrillator uses a USBdrive to transfer data. The
USBdrive connects to a USBport on the computer running Data
Messenger.
You can export data from the XL+ defibrillator to the XL+ USBdrive
using a menu selection in the Data Management mode. Once the data is
exported, you can transfer it to the computer running Data Messenger.
To export event-summary data from the XL+ defibrillator to
the USB drive
1. Locate the USB data port on top of the XL+ defibrillator and insert
the XL+ USB drive into it. For more information, see the HeartStart
XL+instructions for use.
2. Confirm that you are in Data Management mode.
3. Press the Menu Select button.
The Internal Memory menu appears.
4. Use the navigation buttons to select the Export All option.
8 - Working with defibrillators Data Messenger user guide

85
5. Press the Menu Select button to start the task.
The data is exported to the USB drive.
Selecting accessories for data
transfer
Before equipping your organization for data transfer, determine the
defibrillators that you need.
Several HeartStart defibrillators use an infrared connection to transfer
the information to Data Messenger. You need an infrared adapter to
read and transfer this information to Data Messenger.
Most of the HeartStart defibrillators that Data Messenger supports store
data on data cards. Each defibrillator uses a specific type of data card.
Select a compatible card reader or adapter to read and transfer this
information to Data Messenger.
Selecting data-transfer adapters and readers
If your computer did not come installed with the appropriate software or
adapter for the transfer method, you can use an adapter or reader. Use
the following table to identify the requirements for the adapter or drive
that you need.
Click to view a table of defibrillator data-transfer methods
Defibrillator data transfer method Requirements
HeartStart FR2 uses a CompactFlash
data card.
Reading HeartStart FR2 data
HeartStart FR3 uses a custom Philips
version of the SD data card, or
Bluetooth data transfer.
Transferring HeartStart FR3 data
HeartStart FRx uses infrared data
transfer.
Downloading HeartStart FRx and
HeartStart HS1 data
HeartStart HS1 uses infrared data
transfer.
Downloading HeartStart FRx and
HeartStart HS1 data
HeartStart MRx uses a CompactFlash
data card, Bluetooth, or batch LAN
data transfer.
Working with HeartStart MRx data
8 - Working with defibrillators Data Messenger user guide

86
Defibrillator data transfer method Requirements
HeartStart XL uses ATA flash data
cards.
Reading HeartStart XL data
8 - Working with defibrillators Data Messenger user guide
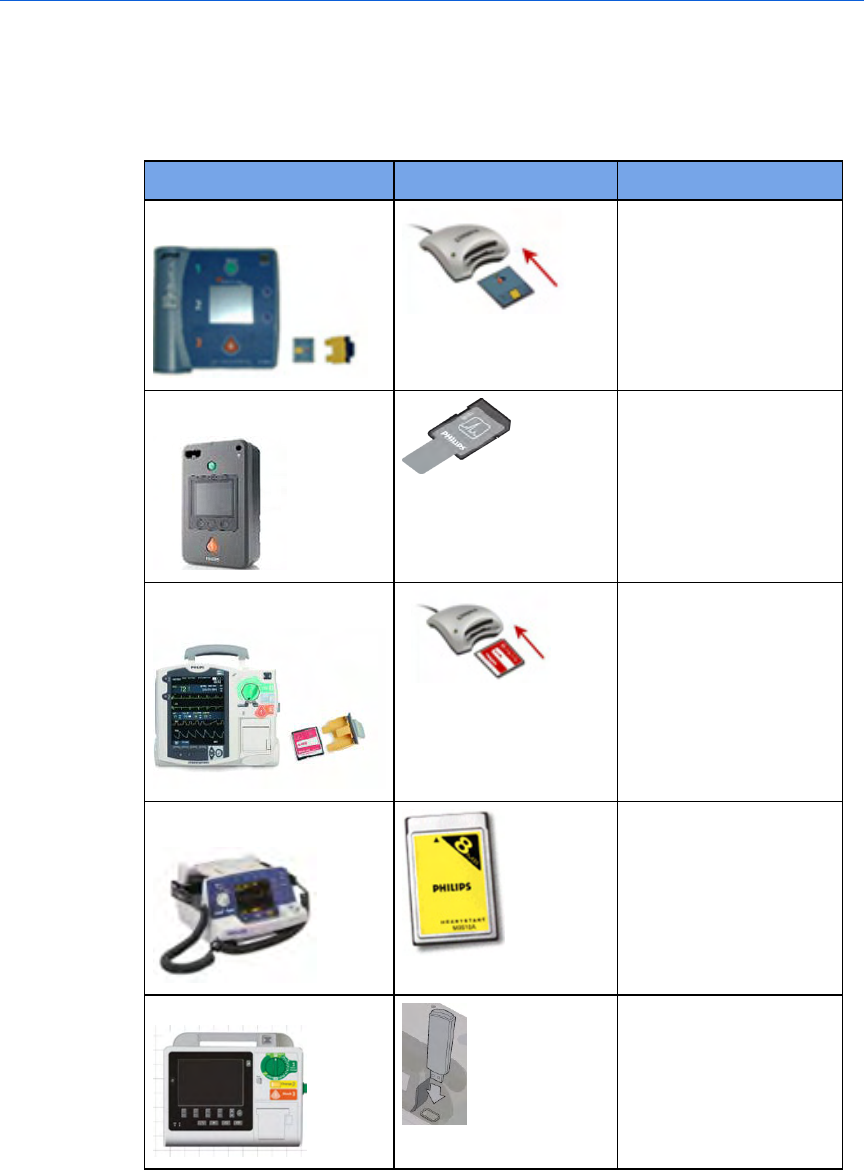
87
Quick reference to data cards
The following table shows the defibrillators with their associated data
cards.
Defibrillator Transfer method Requirements
HeartStart FR2 HeartStart FR2
defibrillators use
CompactFlash cards
with a CompactFlash
card reader.
HeartStart FR3 HeartStart FR3
defibrillators use Philips
secure digital SD data
cards, with a SD data-
card reader.
HeartStart MRx HeartStart MRx
defibrillators use
CompactFlash cards
with a CompactFlash
card reader.
HeartStart XL HeartStart XL
defibrillators use ATA
flash cards with the
ATA flash-card reader.
HeartStart XL+ HeartStart XL+
defibrillators use USB
drives.
8 - Working with defibrillators Data Messenger user guide

88
Selecting Bluetooth accessories
HeartStart MRx and FR3 defibrillators support Data Messenger data
transfer using Bluetooth wireless technology.
Data Messenger was tested with the following Windows systems and
Bluetooth stacks:
• Windows XP or Windows 7: Microsoft Bluetooth stack (for MRx)
• Windows XP or Windows 7: Widcomm Bluetooth stack (for FR3 or
MRx)
If your computer did not come with the installed Bluetooth option, you
must use a Bluetooth adapter that supports these stacks.
The Data Messenger Mobile Edition was tested on the following Windows
6.5 mobile devices, with the Widcomm Bluetooth stack:
• HTC TouchPro2
• HTC HD2
8 - Working with defibrillators Data Messenger user guide

9
System Log
messages
Use the System Log to view all Data Messenger activity and
troubleshoot the processing of patient data. For more information about
using the System Log, see Working with the System Log on page.60.
The System Log includes three types of messages:
• Error messages describe incomplete actions.
• Warning messages alert you to actions that did not complete
because of unexpected events.
• Information messages describe the actions that the software
completes successfully.
The following tables (organized by type of message) describe messages
that appear in the action column and identify possible issues and their
solutions.
Error messages
Action Description Possible issues and solutions
Add a file Failed to add file to
files list: {FileName}
from {DirName}
The disk is either full or non-writeable.
Make sure that the disk is not full and
writeable. Restart Data Messenger.
Apply the
configuration
Failed to apply the
current configuration
The Data Messenger configuration file is
corrupt or cannot be read. Check the
settings in the Configuration window.
Check for
update
Failed to check for
update
Check your connection to the Internet.
Check for
update
Failed to retrieve
product code to check
for update
The Data Messenger configuration file is
corrupt. Reinstall Data Messenger.
89

90
Action Description Possible issues and solutions
Delete file
group
Failed to process the
deletion. Cannot
remove files for:
{FileName} from
{DirName}
The file is inaccessible due to
permissions rights, or another process
is using the file. Make sure that the file
is accessible and restart Data
Messenger.
Delete the
case
manually
Failed to delete the
case. Failed to remove
the source data from :
{SoucePath}
Make sure that the source data is
available and accessible.
Deserialize
internal
information
Failed to retrieve case
information:
{FileName}
The file is inaccessible due to permission
rights or corrupted. Make sure that the
file is accessible.
Export the
configuration
Failed to export
configuration file:
{FileName}
The configuration file is inaccessible due
to permission rights. Make sure that the
file is accessible.
Import the
case
manually
Failed to manually
import case:
{FileName} from
{DirName}
Cannot import a case. Make sure that
the file format is correct and that the
case is accessible.
Import the
configuration
Failed to import
configuration file:
{FileName}
The configuration file is corrupted. Try
again with a new copy of the
configuration file.
Link patient
data
Failed to add patient
data to Case list:
{FileName}
Restart the computer and Data
Messenger.
Link patient
data
Failed to find patient
data for: {FileName}
Send the data again and manually add
the patient information in the fields on
the Cases tab.
Print the
case
manually
Failed to print case:
{CaseName}
Make sure that a default printer is set
and accessible.
Process data Failed to process data:
{FileName}
One of the workflow actions on the
System Log failed to complete. Correct
the cause of the failure and retry.
Process
Forward
Failed to forward the
case data. URL for the
event summary data
was not specified.
Specify the Event Review Pro URL in the
Configuration window on the Case
Workflow tab.
9 - System Log messages Data Messenger user guide

91
Action Description Possible issues and solutions
Process
Forward
Failed to forward the
case data.
Encountered an
unexpected file
extension.
Verify that the file extension is correct
and send the patient data again.
Process
Forward
Failed to forward the
case data. Reached
the maximum
number of retries.
System traffic is preventing the action.
Wait for a period of time and then retry.
Process
Forward
Failed to forward the
patient data. URL for
the 12-lead or PCDT
data was not specified.
Specify the Telemedicine URL in the
Configuration window on the Advanced
Workflow tab.
Remove a
case
Failed to remove case:
{FileName}
Make sure that the computer is not out
of memory or storage space. Restart
Data Messenger.
Retrieve
next case to
process
Failed to retrieve the
next case waiting to
be processed
Make sure that the computer is not out
of memory or storage space. Restart
Data Messenger.
Retrieve the
case
Failed to retrieve case:
{FileName}
A generic failure to retrieve the case
occurred. Try to send the data again.
Retrieve the
configuration
Failed to retrieve
configuration from
file: {FileName}
Configuration file may be corrupt.
Restart Data Messenger and import the
configuration file, or manually enter the
configuration.
Scan for
PCDT
Failed to retrieve all
periodic clinical data
transmissions (PCDT)
files, unable to process
incomplete files for:
{PCDTFileName}
Data Messenger did not receive all three
files from the Bluetooth transmission.
Try to send the data again.
Scan for
PCDT
Failed to retrieve PCDT
for file:
{DONFileName}
Make sure that Data Messenger is
compatible with the MRx device. Check
that there is enough memory and
storage space on the computer. Restart
the MRx device and Data Messenger.
9 - System Log messages Data Messenger user guide

92
Action Description Possible issues and solutions
Scan for
PCDT
Failed to retrieve PCDT
files from folder
{FolderPath}
The folder for PCDT files is either
missing or inaccessible. Verify that the
folder is accessible. In addition, you can
specify a different folder on the
Advanced Workflow tab in the Data
Messenger Configuration window.
Scan IrDA Failed to scan for IrDA
defibrillators
A generic failure to scan IrDA occurred.
Restart Data Messenger and the device.
Scan SD card Failed to scan the SD
card
The SD card is corrupted. Remove the
SD card and reinsert.
Scan for 12-
lead
Failed to scan for 12-
lead
A generic failure to retrieve 12-lead file
occurred. Try to delete the Bluetooth
folder, start Data Messenger, and send
the data again.
Scan for case Failed to load case:
{CaseName}
Failed to create a case for found event
summary data. Try to retransmit the
case.
Scan for case Failed to scan for case A generic failure to retrieve case file
occurred. Make sure that event
summary data are available and restart
Data Messenger.
Start
BLDTBeacon
Failed to start Batch
LAN Data Transfer
Beacon.
Make sure that the configuration is valid
and that the port is accessible from
outside the firewall.
Start Data
Messenger
Failed to start Data
Messenger. The
configuration file is
either missing or
incorrect.
Create a new configuration file using
the Data Messenger Configuration
window.
Start Data
Messenger
Mobile
Edition
Failed to start
HeartStart Data
Messenger Mobile
Edition
Restart the mobile device.
Stop
BLDTBeacon
Failed to stop Batch
LAN Data Transfer
Beacon
Batch LAN Data Transfer (BLDT) did not
exit in time. Make sure that your
computer has adequate resources to
run the application.
Synchronize
the
configuration
Failed to synchronize
the desktop edition
and mobile device
Restart the mobile device and
reconnect it to the Data Messenger
computer.
9 - System Log messages Data Messenger user guide

93
Action Description Possible issues and solutions
Update
patient data
Failed to update the
changed data for:
{FileName}
Cannot map updated patient
information into the data. Restart Data
and the computer.
Write the
configuration
Failed to write FTP
server info
Make sure that the computer has
enough storage space and that the user
has write permission for the output
folder.
Warning messages
Action Description Possible issues and solutions
Add a file Expired trial period.
Data Messenger can
process case data in
Manual Process mode.
The trial period expired. Activate the
license and try again.
Close the
configuration
Closed the
configuration without
saving the changes
You did not save the configuration
changes before you closed the Data
Messenger Configuration window.
Create file list Removed the folder
with an error:
{FolderName}
Removed folder that Data Messenger
does not recognize.
Create file list Failed to add from
folder: {FolderName}
Cannot add the file. Make sure that the
computer is not out of memory.
Restart Data Messenger.
Create file list Removed the file with
an error: {FileName}
Removed file that Data Messenger does
not recognize.
Delete data
card data
Failed to delete file
{FileName}
The file may be in use or file permission
prevents it from being deleted.
Delete data
card data
Failed to delete folder
{FolderName}
The folder may be in use or file
permission prevents it from being
deleted.
Delete data
card data
Failed to delete folder
and content in
{FolderName}
The folder and content may be in use or
file permission prevents it from being
deleted.
Display the
Readme file
Failed to display the
ReadMe file
Cannot find the ReadMe file. Check that
the file exists and that it is associated
with an application that can read it. If
this file is missing, try reinstalling Data
Messenger.
9 - System Log messages Data Messenger user guide

94
Action Description Possible issues and solutions
Display the
user guide
Failed to display the
user guide
Cannot find the user guide. Check that
the PDF file exists and that it is
associated with an application that can
read it. If this file is missing, try
reinstalling Data Messenger.
Install the
Mobile edition
Cannot install the
mobile edition.
Activate the license.
Cannot install the mobile edition
without an active license. Activate the
license and try again.
Migrate user
data
Failed to migrate user
data from Data
Messenger
{FolderName} to
{FolderName}
Make sure that the current version of
Data Messenger was not previously
installed and that previous Data
Messenger user data is not corrupted.
Move to the
backup folder
Failed to move data to
FolderName}
Make sure that the backup folder exists
and that the user has write permission
for the folder.
Move to the
backup folder
Failed to delete file
{FileName}
This file may be in use or file permission
prevents it from being deleted.
Move to the
backup folder
Failed to delete folder
and content in
{FolderName}
The folder and content may be in use or
file permission prevents it from being
deleted.
Process Delete Failed to delete source
for: {FileName}
Check that the data source is in range
and connected, that the data card is
inserted, that network drives are
accessible, and that the file is not in
use.
Process Email Failed to email data:
{FileName}
Check the following: email client and
configuration, accessible network,
computer memory, and computer
storage space.
Process
Export
Failed to export data:
{FileName} to
{FolderName}
Make sure that the computer has
enough memory and storage space. If
folder is on a network share, make sure
that the share is accessible and that
the user has writer permission.
Process
Forward
Failed to forward:
{FileName} to {URL}
Failed to read the file or encountered a
network connection problem. Make
sure that the file can be read, that Data
Messenger can connect to the network,
and that the receiving server is
operational.
9 - System Log messages Data Messenger user guide

95
Action Description Possible issues and solutions
Process
Forward
Failed to forward.
Server response:
{StatusCode}
Received an incorrect response from
the server. Make sure that the
receiving server is running correctly.
Process Print Failed to print data:
{FileName}
Make sure that the printer is ready and
accessible.
Retrieve the
acquisition
Expired trial period.
Data Messenger
processes case data
only in Manual
Process mode.
The trial period expired. Data
Messenger processes case data only in
the Manual Process mode. For full
functionality, contact Philips to
purchase a license.
Scan for 12-
lead
Expired trial period.
Ignored the retrieval
of 12-lead file:
{12LeadFileName}
The trial period expired. Data
Messenger does not transfer incoming
12-lead files. For full functionality,
contact Philips to purchase a license.
Retrieve the
acquisition
Retrieved a duplicate
acquisition on process
list: {CaseName}
A duplicate file exists on the process
list. Data Messenger does not create a
duplicate entry.
Retrieve
Column
Customization
Failed to retrieve
column customization
for tab: {TabName}
The file for the customized layout is
corrupted.
Retrieve the
configuration
Did not create
configuration version
{VersionNumber}
with this Data
Messenger
Unrecognized configuration version.
Data Messenger will attempt to retrieve
baseline information.
Retrieve the
configuration
Failed to retrieve
configuration from
file: {Filename}
The configuration file is missing,
inaccessible, or incorrect. Recreate the
configuration.
Retrieve the
customized
layout
Failed to read setup
file
The setup file for Data Messenger
Manual Process window is either
missing or Data Messenger
encountered a disk read error and
reverted to default settings.
Scan for PCDT Expired trial period.
Ignored the retrieval
of PCDT file:
{PCDTFileName}
The trial period expired. For full
functionality, contact Philips to
purchase a license.
Scan for PCDT Found a duplicate
PCDT file:
{PCDTFileName}
Duplicate PCDT ignored by Data
Messenger.
9 - System Log messages Data Messenger user guide

96
Action Description Possible issues and solutions
Retrieve
registry value
Failed to retrieve
registry value:
{RegistryKey}
Make sure that Data Messenger is
correctly installed and that the user
has access to registry.
Save the
customized
layout
Failed to save setup
file
The setup file for Data Messenger
Manual Process window is either write-
protected or in use or Data Messenger
encountered a disk write error.
Scan for 12-
lead
Found a duplicate 12-
lead:
{12LeadFileName}
Duplicate 12 lead ignored by Data
Messenger.
Scan for case Found a duplicate
case:
{CaseFileName}
Duplicate case ignored by Data
Messenger.
Scan for case Failed to load case:
{CaseName}
Make sure that the case is accessible
and that the user has read permission.
Make sure that the computer has
adequate memory and storage space.
Set registry
value
Failed to set
{RegistryKey} with
value: {value}
Make sure that Data Messenger is
installed correctly, and that the user
has permission to modify registry.
Restart Data Messenger.
Start Data
Messenger
Mobile Edition
Data Messenger
Mobile does not email,
export, or print cases
Use the desktop Data Messenger
version to email, export, or print cases.
Stop Data
Messenger
Stopping Data
Messenger. The Data
Messenger
Configuration window
will close.
Data Messenger is closing, but the
Configuration window is still open.
Stop Data
Messenger
Stopping Data
Messenger. The Data
Messenger Manual
Process window will
close.
Data Messenger is closing, but the Data
Messenger Manual Process window is
still open.
Synchronize
the
configuration
Failed to detect a
connected mobile
device
Either ActiveSync is not running or the
mobile device is not connected to the
Data Messenger computer. Try to
connect the mobile device to the
computer and try again.
Synchronize
the
Failed to synchronize
errored files from:
Make sure that the Mobile device is
connected and accessible. Restart both
9 - System Log messages Data Messenger user guide

97
Action Description Possible issues and solutions
configuration {MobileFolderPath} the Mobile device and computer.
Synchronize
the
configuration
Cannot synchronize
the desktop and
mobile editions.
Cannot synchronize the desktop and
mobile editions without an active
license. Activate the license and try
again.
Validate the
configuration
Failed to validate the
configuration
The configuration is not valid. Correct
the error identified by Data Messenger.
9 - System Log messages Data Messenger user guide

10
Using the
HeartStart Data
Messenger Mobile
Edition
The HeartStart Data Messenger Mobile Edition (Mobile Edition) is used
by some defibrillator programs that need to transmit data wirelessly
from the field to a data management system in another location—for
example, from an ambulance to a hospital. Mobile Edition is available
only in English.
After you install and activate the English version of Data Messenger
software on your computer, you can install the Mobile Edition on a
pocket PC or smart phone that is equipped with infrared, Bluetooth, or
data-card access. See Mobile Edition prerequisites on page.98.
The Mobile Edition receives patient data from defibrillators, and
prepares and forwards (processes) the data according to the
preconfigured workflow. The Mobile Edition displays System Log
messages as Data Messenger processes the data. It can also prepare
the defibrillator for the next patient by removing the current patient
data from Data Messenger and its data source, the defibrillator, a data
card, or the Bluetooth folder. The Mobile Edition does not display or print
reports.
Mobile Edition prerequisites
The Mobile Edition is contained only in the English Data Messenger
software. To use Mobile Edition, you need to meet these prerequisites:
• Install the English version of Data Messenger on a computer with a
supported Windows operating system, and activate the license.
98

99
• Install synchronization software for your operating system, as
described in the system requirements for Mobile Edition.
• Your mobile device must have a supported wireless operating
system, and must be equipped with Bluetooth wireless technology,
infrared (IrDA), or data-card access.
Before using Mobile Edition to manage actual cases, test Mobile
Edition on your mobile device by receiving and forwarding data to
ensure that the device and configuration are working properly.
System requirements for the Mobile
Edition
Hardware Requirements and purpose
Data Messenger
computer
Install and activate an English version of Data
Messenger on a computer with a supported Windows
operating system.
For the Data Messenger system, see System
requirements on page.8.
Mobile devices To monitor Data Messenger as the software receives,
prepares, and transfers patient data according to the
preconfigured workflow:
• Windows 6.5 mobile device, with the Widcomm
Bluetooth stack
• Wi-Fi or Internet data access to transfer patient
data
One or more of the following transfer methods:
• Infrared transmission
• Data-card access
• Bluetooth transmission
For information about Bluetooth accessories, see
Selecting Bluetooth accessories on page.88.
To synchronize information between Data Messenger
and Mobile Edition, go to the Microsoft Web site for the
current version of:
• Microsoft ActiveSync for Windows XP or Windows
tablet PC
• Windows Mobile Device Center for Windows 7
10 - Using the HeartStart Data Messenger Mobile Edition Data Messenger user guide

100
Guidelines for using the Mobile
Edition
Philips recommends that you keep the following guidelines in mind when
using the Mobile Edition.
The Mobile Edition supports the following features:
• Forwards defibrillator data within the constraints of your network.
• If a computer is within the company firewall, then the Mobile
Edition can forward data to computers within the firewall.
• If the mobile device connects to the Internet from outside the
company firewall, then the destinations must be on a registered
Internet domain.
• Transfers defibrillator data using the following transfer methods,
when supported by the mobile device:
• Infrared port
• Bluetooth from HeartStart MRx or HeartStart FR3
• Data card
• Transfers data directly from the defibrillator, instead of from Data
Messenger on the computer. If the defibrillator data contains the
reference ID and institution information, then the Mobile Edition
includes this information in the file.
• Automatically backs up cases that fail to process on the Mobile
Edition. The software backs up the cases onto the computer when
you synchronize the Mobile Edition and Data Messenger. After the
synchronization, Data Messenger lists these cases on the Data
Messenger Manual Process window. You can then process selected
cases manually from the Cases tab.
The Mobile Edition does not support the following features:
• Sending emails to a configured destination
• Displaying or printing
• Exporting case data to a folder or a URL
• Backing up processed data (due to space limitations)
10 - Using the HeartStart Data Messenger Mobile Edition Data Messenger user guide

101
Installing the Data Messenger Mobile
Edition
After you activate the English version of Data Messenger on your
computer, you can install the Mobile Edition. For information about
installing Data Messenger on your computer, see Installing Data
Messenger on page.12.
You must perform the following procedures from the Data Messenger
computer to complete the Mobile Edition installation and setup.
• Install the Mobile Edition software on the Data Messenger computer
and the mobile device.
• Synchronize the mobile device with the Data Messenger computer.
Installing the Mobile Edition using a Windows 7
computer
Follow these installation instructions if you are running Data Messenger
on a Windows 7 computer.
To install the Mobile Edition using a Windows 7 computer
1. Turn on the mobile device.
2. On the Data Messenger computer Start menu, click Windows
Mobile Device Center.
If the Windows Mobile Device Center (WMDC)window does not
display, complete the following steps:
a. Click the Windows Start button.
b. Click All Programs.
c. Click Windows Mobile Device Center.
The Windows Mobile Device Center window appears.
3. In the WMDC window, connect the mobile device to the Data
Messenger computer. For information about how to connect your
mobile device to a computer, consult your mobile device manual.
Wait until the WMDC window displays the Connected status.
If the connected status does not display, disconnect and reconnect
the mobile device on the computer.
10 - Using the HeartStart Data Messenger Mobile Edition Data Messenger user guide

102
4. In Data Messenger, complete the following steps:
a. Open the Data Messenger Configuration window.
b. On the toolbar, click the down-arrow to the right of the Mobile
button. The toolbar button displays a drop-down menu.
c. Click Install on Device. Data Messenger starts the installation
process.
d. Follow the on-screen instructions.
A message might appear stating that the Data Messenger
installation will make changes to the computer.
e. Click Yes to continue with the installation.
5. On the WMDC, hold the cursor over Programs and Service. When the
list appears, click More.
6. From the choices that appear, click Add/Remove Programs.
7. Make sure that both Microsoft .NET CF 3.5 and Philips HeartStart
Data Messenger Mobile are checked.
8. Click OK.
The installation completes successfully.
9. On the mobile device, follow the on-screen instructions to complete
the following steps:
a. Install Microsoft .NET 3.5 CF.
b. Install Philips HeartStart Data Messenger Mobile.
10. After successfully installing the software on the mobile device, click
OK to close the mobile device installation window.
11. On your computer, return to Data Messenger and click Finish to
complete the installation.
12. Synchronize Data Messenger on the computer with Data Messenger
on the mobile device.
See Synchronizing Data Messenger with the Mobile Edition on
page.104
Installing the Mobile Edition using a Windows
XP computer
Follow these installation instructions if you are running Data Messenger
on a Windows XP computer.
10 - Using the HeartStart Data Messenger Mobile Edition Data Messenger user guide

103
To install the Mobile Edition from Microsoft Windows XP Pro or
Windows XP Tablet Edition
1. Connect the mobile device to the Data Messenger computer.
Wait until the Synchronization Setup Wizard displays.
a. Follow the on-screen instructions.
b. Click Finish.
2. If the ActiveSync window does not display, complete the following
steps:
a. Click the Windows Start button.
b. Click All Programs.
c. Click Microsoft ActiveSync. The ActiveSync window appears.
3. In Data Messenger, open the Data Messenger Configuration window.
4. On the toolbar, click the Mobile button.
5. Click Install on Device.
Data Messenger starts the installation process.
6. Follow the on-screen instructions on the Data Messenger computer
and on the mobile device.
The Add/Remove Programs window appears on the Data Messenger
computer.
7. Verify that both Microsoft .NET CF 3.5 and Philips HeartStart Data
Messenger are selected, and click OK.
8. Synchronize Data Messenger on the computer with Data Messenger
on the mobile device.
See Synchronizing Data Messenger with the Mobile Edition on
page.104.
Understanding synchronization
When you configure the Data Messenger computer, the configuration
also controls the configuration on the Mobile Edition. You must
synchronize the Data Messenger computer and Mobile Edition after you
install the Mobile Edition and after you modify the configuration for the
Data Messenger computer.
The synchronization process downloads the configuration settings to the
Mobile Edition, uploads, and merges the System Log for the Mobile
Edition with that of the Data Messenger computer.
10 - Using the HeartStart Data Messenger Mobile Edition Data Messenger user guide

104
During synchronization, the Mobile Edition also uploads any case that did
not process successfully. The Data Messenger computer lists the data on
the Cases tab. You can then process the data manually. For more
information, see Processing cases on page.54.
After synchronization, the mobile log and the list of unsuccessful cases
are available only on the Data Messenger computer, and no longer on
the Mobile Edition.
Synchronizing Data Messenger with the Mobile
Edition
Philips recommends that you synchronize the Data Messenger computer
and the Mobile Edition frequently, such as at the end of every work shift.
This will help ensure that the System Log contains a complete record of
the Mobile Edition system activity.
To synchronize Data Messenger and the Mobile edition
1. Connect the mobile device to your Data Messenger computer. For
more information, see your mobile device documentation.
2. Open the Data Messenger Configuration window.
3. On the toolbar, click the Mobile button.
4. On the drop-down menu, click Synchronize Configuration.
Data Messenger completes the following:
• Downloads the configuration to the mobile device
• Uploads the System Log to the Data Messenger computer
• Uploads any cases that did not process successfully
When the synchronization is complete, Data Messenger displays a
message confirming this.
5. Click OK.
6. To use the new configuration, restart the mobile device by turning it
off, and then on.
For more information, see your mobile device documentation.
10 - Using the HeartStart Data Messenger Mobile Edition Data Messenger user guide

105
Starting the Mobile Edition
The Mobile Edition starts automatically when you turn on the mobile
device.
You can also start the Mobile Edition manually.
To start the Mobile Edition manually
On the mobile device Start menu, tap Programs, and then tap Philips
HeartStart Data Messenger Mobile.
The Data Messenger Mobile screen displays all log messages. As the
patient event-summary data, 12-lead reports, and periodic clinical data
are processed, the messages appear with the most recent message at
the top of the list. For more information, see System Log messages on
page.89.
Using the Mobile Edition
The Mobile Edition uses the configuration on the Data Messenger
computer to process and monitor patient data. For example, if you set
up Data Messenger to erase the original data on the Case Workflow tab,
the Mobile Edition processes the cases and erases them from Data
Messenger and its data source, the defibrillator, a data card, or the
Bluetooth folder.
If you use the Mobile Edition to transfer cases to HeartStart Event
Review Pro, the Mobile Edition transfers the original defibrillator
data in the .hic file format. If you add a reference ID to a case on
the General tab, the reference ID transfers to HeartStart Event
Review Pro.
Status messages display on the mobile device as Data Messenger
processes the patient event summary, 12-lead reports, or periodic
clinical data.
10 - Using the HeartStart Data Messenger Mobile Edition Data Messenger user guide

106
Waking the mobile device before transmissions
Philips recommends that you also “wake up” your mobile device just
before transmitting defibrillator data to Philips Data Messenger Mobile
(Data Messenger Mobile). This ensures that the mobile device receives
transmissions and does not “time out” during the transmission.
Monitoring activity on the mobile device
In addition to monitoring Data Messenger activity on the System Log tab
on the Data Messenger computer, you can monitor system activity on
the mobile device.
As the Mobile Edition transfers the cases to the configured destinations,
it displays the System Log messages.
To view Data Messenger activity
Turn on the mobile device. For more information, see your mobile
device documentation.
The Data Messenger Mobile screen displays all log messages.
To manage the list of messages
Tap Clear to clear the list of messages from the screen, not from the
System Log.
To close the Mobile Edition
Use one of the following methods:
• Tap Exit to close Data Messenger Mobile.
• On touch-screen devices, tap the X in the upper right corner to hide
the software.
Uninstalling the Mobile Edition
This topic discusses how to remove the Mobile Edition software from the
mobile device. See Removing the Mobile Edition using Windows 7 on
page.107 and Removing the Mobile Edition using Windows XP on
page.108.
10 - Using the HeartStart Data Messenger Mobile Edition Data Messenger user guide

107
For information about uninstalling Data Messenger from your computer,
see Uninstalling Data Messenger on page.12.
Removing the Mobile Edition using Windows 7
To remove Mobile Edition from the mobile device
1. Turn on the mobile device.
2. From the Data Messenger computer Start menu, click All
Programs.
3. Click Windows Mobile Device Center.
4. With the Windows Mobile Device Center window open, connect the
mobile device to the Data Messenger computer.
Wait until the Windows Mobile Device Center window displays the
Connected status.
If the status does not display, disconnect the mobile device from the
computer, and then reconnect.
5. On the mobile device, exit the Data Messenger Mobile software.
6. In the Windows Mobile Device Center window, complete the
following steps:
a. Click Connect without Setting Up Your Device.
b. Place the mouse over Programs and Service. The text expands.
c. Click More >.
d. Click Add/Remove Programs.
e. Verify that Philips Data Messenger Mobile is not selected.
f. Click OK.
7. Follow the on-screen instructions, if any, on the Data Messenger
computer and mobile device.
8. From the mobile device Start menu, verify that the Data Messenger
Mobile software was removed.
9. Close the Windows Mobile Device Center window.
For information about uninstalling Data Messenger from your computer,
see Uninstalling Data Messenger on page.12.
For information about synchronizing, see Synchronizing Data Messenger
with the Mobile Edition on page.104.
10 - Using the HeartStart Data Messenger Mobile Edition Data Messenger user guide

108
Removing the Mobile Edition using Windows XP
Before removing the Mobile Edition, make sure that it is connected to
the Data Messenger computer.
To remove Mobile Edition from the mobile device
1. Open the Microsoft ActiveSync window on the computer that runs
Data Messenger.
a. Click the Windows Start button.
b. Click All Programs.
c. Click Microsoft ActiveSync. The ActiveSync window appears.
2. On the Tools menu, click Add/Remove Programs.
The Microsoft ActiveSync window displays a dialog box.
3. Verify that Philips Data Messenger Mobile is not selected.
4. Click OK.
If the mobile device provides any on-screen instructions, follow them.
For information about uninstalling Data Messenger from your computer,
see Uninstalling Data Messenger on page.12.
For information about synchronizing, see Synchronizing Data Messenger
with the Mobile Edition on page.104.
10 - Using the HeartStart Data Messenger Mobile Edition Data Messenger user guide
11
Implementation
references
You can use the references listed in this topic while you set up and
troubleshoot HeartStart Event Review Pro and HeartStart Telemedicine
Server for use with Data Messenger.
To obtain a copy of the documents, contact your Philips representative.
You can also visit the Philips Web site at the following URL address:
http://www.healthcare.philips.com/main/support/index.wpd
The Data management solutions implementation guide is available
only in English.
• To plan the data management implementation, see the Data
management solutions implementation guide, and the “Streamlining
data management workflow” application note.
• To set up the FTP server to use the HeartStart MRx batch LAN data-
transfer feature, see HeartStart MRx instructions for use and Data
management solutions implementation guide.
• To set up the Bluetooth transmission option to receive HeartStart
MRx data, see Downloading HeartStart MRx data using Bluetooth on
page.78 and the Data management solutions implementation guide.
• To troubleshoot Data Messenger, see the Data management
solutions implementation guide.
• To set up and use the HeartStart Event Review Pro, see the
HeartStart Event Review Pro user guide.
• To set up and use the HeartStart Telemedicine Server, see the
HeartStart Event Review Pro user guide.
• To plan the data transmission implementation for the HeartStart
MRx and HeartStart Telemedicine Server, see the “Emergency care
clinical data transmission networks” application note.
109

12
Customer support
Philips strives to provide you with excellent customer service and
technical support. Software updates for the integrated applications are
available from the application Help menu. From the Help menu, click
Check for Updates.
Customer support is available through email, Internet, and telephone.
Email product support is available in English only at:
datamessenger.support@philips.com.
Internet product support is available at the following address:
http://www.philips.com/DataManagementSupport
For telephone assistance outside the United States, call your sales
representative or local response center. See the following tables for
contact information. You can also navigate to technical support
telephone numbers for data management products at this address:
http://www.healthcare.philips.com/main/services/response_center
Region Address Telephone number
United States Philips Healthcare
3000 Minuteman Road
Andover, Massachusetts
01810-1099
800.722.9377
Canada Philips Healthcare, a Division
of Philips Electronics Ltd.
281 Hillmount Road
Markham, Ontario, Canada
L6C 2S3
+1(800) 291-6743
Authorized EU
Representative
Europe, Middle East,
and Africa
Philips Medizin Systeme
Boeblingen GmbH Cardiac and
Monitoring Systems
Hewlett-Packard Strasse 2
71034 Boeblingen, Germany
(+49) 7031 463-2254
Latin America Philips Medical Systems Ltda.
Rua Verbo Divino - 1400 - 7o
Andar0
0800 7017789
110

111
Region Address Telephone number
04719-002 - Sao Paulo, Brazil
Asia Pacific Philips Electronics Hong Kong
Ltd. 6/F, Core Building 1 1
Science Park East Avenue
Hong Kong Science Park
Shatin. New Territories, Hong
Kong
+852 2821 5888
You can also navigate to technical support telephone numbers for data
management products at the above addresses.
For telephone support in English only, call the following numbers
between 9:00 AM and 5:00 PM, Pacific Time:
• 800.722.9377, inside the United States
• +1.770.510.1130, outside the United States
Philips Response Center telephone numbers
The following tables contain telephone numbers for Philips Response
Centers around the world.
North America
Country Telephone number
Canada 800.323.2280
United States of America 800.722.9377
Europe
Country Telephone number
European International Sales 41 22 354 6464
Austria 01 60 101 820
Belgium French 02 525 68 80
Dutch 02 525 68 81
Finland 09- 615 80 400
France 0810 835 624
Germany 0180 3333 544
Italy 800 232100
12 - Customer support Data Messenger user guide
112
Country Telephone number
Luxembourg +32 2 525 68 80
Netherlands 040 27 85600
Portugal 800 201766
Spain 900 180612
902 304050
Sweden 08-59 85 2530
Switzerland German 0800 80 3000
French 0800 80 3001
United Kingdom 0870 532 9741
Asia and Pacific
Country Telephone number
Australia 1800 251 400
China Beijing 800 810 0038
Hong Kong 852 2821 5888
India 18004256788
Indonesia 021 794 7542
Japan 0120 381 557
Korea 080 372 7777
Seoul 02 3445 9010
Malaysia 1800 866 188
New Zealand 0800 251 400
Philippines 02 845 7875
Singapore 1800 PHILIPS
(1800-744-5477)
South Africa 011 471 6000
Thailand 02 614 3559
Taiwan 0800 005 616
12 - Customer support Data Messenger user guide

113
Comments or suggestions?
Please send your feedback and suggestions to:
datamessenger.support@philips.com.
Supported help
Customer support technicians provide help for the following:
• Explaining the proper use of application features and answering your
questions about how the application works
• Explaining the proper installation and maintenance of the application
• Assisting you in selecting and configuring card readers
Customer support technicians do not provide help for the following:
• Interpreting ECG or medical data. Please call your medical director
or clinical specialist.
• Repairing hardware. The support technicians can help you determine
if you have a hardware problem, but they cannot help you fix
problems that are not related to the Philips HeartStart application
software.
• Troubleshooting defibrillators. Instead, call Philips Customer
Support and ask for defibrillator support.
• Troubleshooting non-Philips products.
Helping us help you
You can help our technicians give you good support by following these
steps:
1. Call from a phone near your computer.
2. Start the software application.
3. Have the following information:
• Windows version.
• The application version number. This is available from the Help
menu. Click the About option.
• A written copy of the error message text.
• The activity and task you did when the error occurred.
12 - Customer support Data Messenger user guide

13
Glossary
ACI-TIPI
For acute cardiac ischemia time insensitive predictive instrument. A
Philips software tool that can provide a second opinion and decrease the
time between the onset of a patient’s acute cardiac ischemia (ACI)
symptoms and the treatment of interventional cardiology. The ACI-TIPI
feature computes a patient’s likelihood of having an ACI based on the
patient’s age, gender, chest pain status, and acquired 12-lead ECG.
When the defibrillator runs the ACI-TIPI analysis, the interpretative
block on the 12-lead report includes ACI-TIPI data.
Administration
In Administration mode, you can apply or change configuration settings
in a HeartStart supported defibrillator, and administrator can view
HeartStart Configure activities.
Administration mode
A setting on HeartStart defibrillators that allows the defibrillator to send
and receive information.
Administration pane
In this pane, you can view System Log entries for the computer running
HeartStart Configure.
AED
Acronym for Automated External Defibrillator. A defibrillator that
automatically performs rhythm analysis of the patient’s surface
electrocardiogram.
All Configurations
A feature in the Saved Configurations pane that allows you to view all
configurations that are available for viewing and editing in HeartStart
Configure.
114

115
Bluetooth
A short-range wireless technology that uses radio links between devices
such as defibrillators and computers, mobile computers, mobile phones,
and other portable devices.
Bluetooth wireless transmission
Use of an optional FR3 or MRx Bluetoothwireless technology transceiver
module to transfer a configuration from a HeartStart FR3 defibrillator to
a Bluetooth-enabled computer.
Card reader
Hardware that reads information from a data card.
CFG
Acronym for Configuration file. This binary file extension type is used
for a HeartStart FR3 configuration file.
Configuration
A file that sets the behavior of a defibrillator.
Configuration Tasks
A task pane in HeartStart Configure that allows you to create
defibrillator configurations per American Heart Association (AHA)
guidelines, and set time, date, and language options for the HeartStart
FR3 defibrillator.
Configurations (feature)
A feature set that allows you to configure, manage, and review
information about a defibrillator configuration. HeartStart Configure
identifies each configuration based on the type, name and the date and
time of the configuration. This allows you to list configurations based on
a variety of values.
Configurations pane
The Configurations pane allows you to view and manage supported
defibrillator configurations.
CPR
Acronym for Cardiopulmonary Resuscitation. A technique for providing
artificial respiration and heart compressions to maintain life in a victim
of Sudden Cardiac Arrest (SCA).
13 - Glossary Data Messenger user guide

116
DAT
Acronym for data file. This binary file format is used by Event Review
3.5 and Event Review Pro 3.5 for HeartStart FRx and HS1 defibrillator
configurations.
Data Card
A computer storage device used for recording and storing information.
Some HeartStart defibrillators use data cards to record configuration,
ECG, and audio information.
Defibrillator event
Information received from a defibrillator. Examples are alarms, shocks,
measurements, and error conditions.
Device
A generic term used for defibrillators and data cards.
ECG
Acronym for Electrocardiogram. The electrical rhythm of the heart as
detected through defibrillator pads.
EMS
Acronym for Emergency Medical Services.
Error
Describes a system error or an erroneous input by the user.
Export
Saving a configuration as a file for use on another computer running
HeartStart Configure. This is typically done to share a configuration with
other users or to back up a configuration.
Feature
A link or button within the HeartStart Configure task pane that allows
you to complete a task.
FR3
A HeartStart compact, battery-powered automated external defibrillator
(AED) designed for use by trained responders to treat ventricular
fibrillation (VF), the most common cause of sudden cardiac arrest
(SCA).
13 - Glossary Data Messenger user guide

117
FRx
A HeartStart compact, battery-powered automated external defibrillator
(AED) designed for use by trained responders to treat ventricular
fibrillation (VF), the most common cause of sudden cardiac arrest
(SCA).
Getting Started
A task pane in HeartStart Configure that allows you to navigate to online
help, selecting accessories, and check for software updates.
HS1
A HeartStart compact, battery-powered automated external defibrillator
(AED) that is designed for simple and reliable operation by minimally
trained users to treat ventricular fibrillation (VF), the most common
cause of sudden cardiac arrest (SCA).
HTTP
Acronym for Hypertext Transfer Protocol. The set of rules for
exchanging files (text, graphic images, sound, video, and other
multimedia files) on the World Wide Web.
Import
Opening a defibrillator configuration file that is not stored in HeartStart
Configure, and was created by another user on another installation of
HeartStart Configure.
Incident
The series of events involved in treating a patient with a defibrillator.
Information
Details action and events of an end-user using HeartStart Configure.
Language Card
A secure digital (SD) card that can be purchased separately for the
HeartStart FR3 defibrillator model. It contains languages used by the
local culture. You can either change the primary language, or set a
second language for bilingual operation.
License Manager
The License Manager allows you to type in your registration key to
activate HeartStart Configure software.
13 - Glossary Data Messenger user guide

118
Navigation pane
Use the navigation pane to navigate to workspaces and to select a
defibrillator and perform defibrillator configuration tasks.
PST
For Periodic Self Test. A self-administered test mode that a HeartStart
defibrillator runs to ensure that all defibrillator components are
functional and work properly. Test results are Pass, Warning, or Call
customer support.
Save
Adding a new configuration the information and its associated details to
the HeartStart Configure dataset for reuse later on other defibrillators in
order to standardize defibrillator behavior.
Saved configurations
The area of the Navigation pane where configurations can be viewed and
filtered based on supported defibrillator type.
System Log
The System Log lists all monitored application activity. Use the System
Log to review application usage.
Task wizard
A software feature that guides the user through a task.
Workspace
The pane to the right of the HeartStart Configure navigation pane. It
displays the active window for entering and viewing information.
XML
Acronym for eXtensible Markup Language. This file format has a set of
rules for encoding documents in machine-readable form. It is used for
HeartStart Configure 3.0 configuration files. A HeartStart Configure 3.0
file is exported in the XML file format.
13 - Glossary Data Messenger user guide
A
activating Data Messenger 13, 15
by email 14
using the Internet 13
Administration mode 67, 73-74
Automatic mode 32-33, 49, 56, 59
B
batch LAN data transfer FTP 82
prerequisites 83
using with MRx 82
Bluetooth 28
accessories 88
pairing and testing 80
prerequisites 79
setup for MRx 78
using to download from MRx 78, 81
C
cases
deleting 54
determining date and time 75
editing 51
identifiers 34
importing 53
opening 53
processing 54
receiving 49
selecting 50
sorting and grouping 62
viewing 50
configuration 23, 29, 32
Automatic mode 33
closing window 32
exporting 46
FR2 and XL sample 26
HS1 and FRx sample 24
importing 45
MRx sample 27
saving 45
customer support 110, 113
D
data cards
adapters 77
readers 85
Data Messenger
downloading 10
icon menu 57
starting 18
synchronizing with Mobile Edition 104
Index
119

tasks 21
transmission summary 19
uninstalling 12
defibrillators
deleting data from 55
supported 65
document conventions 17
downloading Data Messenger 10
updates 11
E
error messages 89
F
feedback (notifications)
in Automatic mode 36
FR3 SeeHeartStart FR3
FRx SeeHeartStart FRx
Full Disclosure report 52
H
HeartStart FR2, reading data 71
HeartStart FR3 defibrillator
transferring data 67
transferring using Bluetooth 68
HeartStart FRx 76
deleting cases 76
downloading data 72-73
HeartStart HS1 76
deleting cases 76
downloading data 72, 74
HeartStart MRx 77
Bluetooth pairing and testing 80
Bluetooth prerequisites 79
cleaning up failed transmissions 42
downloading using batch LAN data
transfer 82
downloading using Bluetooth 78
specifying inboxes 40
HeartStart XL defibrillator, reading data 83
help 110
HS1 SeeHeartStart HS1
I
implementation references 109
infrared connections 72
installation
Data Messenger 12
Mobile Edition 101
L
limited-feature version 10
M
Manual Process mode 37, 47-48
closing window 49
confirmation of case removal 33
Mobile Edition 98, 105
guidelines 100
installation 101
installing using Windows 7 101
installing using Windows XP 102
monitoring system activity 106
prerequisites 98
starting 105
synchronizing with Data Messenger 104
system requirements 99
Index Data Messenger user guide
120

uninstalling using Windows 7 107
uninstalling using Windows XP 108
N
new features 16
P
product support 110
R
reports 52
response center telephone numbers 111
S
sales support contact information 110
system log 60
emailing 63
number of days to store messages 35
retention period 63
sorting entries 62
working with columns 61
system requirements 8
Mobile Edition 99
T
telephone numbers for support 111
telephone support 111
typographical conventions 17
U
uninstalling 12
Mobile Edition 106
updated software 11
W
workflows 20
X
XL SeeHeartStart XL defibrillator
XL+Defibrillators
Transferring XL+ data 84
Index Data Messenger user guide
121
